上文《Flink应用开发系列(三十五)DataStream开发之Watermark介绍》我们对水位线做了一下基础的介绍,下面我们来实现一下水位线的案例。这里我们还是以用户登录日志监控背景为需求点来实现整个代码,详细步骤如下:
1)初始化flink执行环境
//初始化flink基础环境
StreamExecutionEnvironment env = StreamExecutionEnvironment.getExecutionEnvironment();
2)设置当前的处理方式为事件时间模式
//设置处理事件为EventTime
env.setStreamTimeCharacteristic(TimeCharacteristic.EventTime);
备注:
1、在目前的flink版本中我们其实不需要设置这个模式,因为默认模式是TimeCharacteristic.EventTime
3)添加数据源
这里的话我们添加一个数据源,按照正常道理来说,这里应该使用kafka等一系列的mq的connector作为sorce,但是这里主要是演示,比较麻烦,因此我们这里做一个自定义的数据源,使用while(true)的方式直接生产数据即可,详细步骤如下:
首先创建一个用户登录日志的实体类,示例代码如下:
package org.example.model;

import lombok.*;

import java.io.Serializable;

@Data
@NoArgsConstructor
@AllArgsConstructor
@ToString
@EqualsAndHashCode
@Builder
public class UserLoginLogsPoJo implements Serializable {

    //登录手机号码
    private String phoneNo;

    //登录结果
    private Boolean loginSuccess;

    //失败原因
    private String reason;

    //登录时间
    private Long loginTime;

}
然后我们自定义一个source来生产这个实体的数据,示例代码如下:
package org.example.datastream.sources;

import org.apache.flink.streaming.api.functions.source.RichSourceFunction;
import org.example.model.UserLoginLogsPoJo;

import java.util.Random;

public class UserLoginSource extends RichSourceFunction<UserLoginLogsPoJo> {

    /**
     * 使用工具随机生成10个手机号码,生成网址:https://uutool.cn/phone-generate/
     */
    private String[] phoneNos = new String[]{"15860613545", "18915982795", "13272853467", "13750385255", "17808634790", "18242886305", "14556317188", "13475371257", "14575114507", "14575114507"};

    private Boolean[] su = new Boolean[]{true, false};

    private static final Random RANDOM = new Random();


    Boolean isRunning = Boolean.TRUE;

    @Override
    public void run(SourceContext<UserLoginLogsPoJo> sourceContext) throws Exception {
        while (isRunning) {

            boolean success = su[RANDOM.nextInt(su.length)];
            UserLoginLogsPoJo loginlog = UserLoginLogsPoJo.builder().phoneNo(phoneNos[RANDOM.nextInt(phoneNos.length)]).loginSuccess(success).loginTime(System.currentTimeMillis()).build();
            if (!success) {
                loginlog.setReason("登录失败");
            }
            sourceContext.collect(loginlog);
        }
    }

    @Override
    public void cancel() {
        isRunning = Boolean.FALSE;
    }
}
最后我们在代码中把这个source添加进去:
//添加source,这里的source我们构造一个循环来产生一些用户登录数据
DataStreamSource<UserLoginLogsPoJo> source = env.addSource(new UserLoginSource());
4)设置水位线
这里的话我们把水位线设置为3秒,同时使用用户登录日志里面的loginTime字段作为基准,示例代码如下:
//在数据源的时候设置水印,这样可以让后面处理的数据更加精准。
SingleOutputStreamOperator<UserLoginLogsPoJo> watermakerSource = source.assignTimestampsAndWatermarks(
        //设置水位线的延迟时间为3秒
        WatermarkStrategy.<UserLoginLogsPoJo>forBoundedOutOfOrderness(Duration.ofSeconds(3))
                //设置事件时间以登录日志的时间为准
                .withTimestampAssigner((event, timestamp) -> event.getLoginTime()));
5)开启时间窗口
这里主要是做时间窗口的设定,规定对这个事件窗口范围内的数据进行逻辑计算
//开启时间窗口函数,计算数据
WindowedStream<UserLoginLogsPoJo, String, TimeWindow> window = watermakerSource.keyBy(a -> a.getPhoneNo()).window(TumblingProcessingTimeWindows.of(Time.seconds(5)));
6)统计用户的登录失败次数
这里我们需要统计下用户的登录失败次数,首先声明一个model,示例代码如下:
package org.example.model;

import lombok.*;

import java.io.Serializable;

@Data
@NoArgsConstructor
@AllArgsConstructor
@EqualsAndHashCode
@ToString
@Builder
public class UserLoginRisk implements Serializable {

    private String userPhoneNo;

    private Integer FailNos;

}
然后我们使用apply方法来处理整个的逻辑,示例代码如下:
//对每个时间窗口内的函数进行统计计数,做最后的逻辑处理,这里我们判断登录此时大于3就把数据采集起来
window.apply(new RichWindowFunction<UserLoginLogsPoJo, UserLoginRisk, String, TimeWindow>() {
            @Override
            public void apply(String key, TimeWindow timeWindow, Iterable<UserLoginLogsPoJo> iterable, Collector<UserLoginRisk> collector) throws Exception {

                int sum = 0;

                for (UserLoginLogsPoJo log : iterable) {
                    if (!log.getLoginSuccess()) {
                        sum += 1;
                    }
                }
                if (sum > 3) {

                    collector.collect(UserLoginRisk.builder().userPhoneNo(key).FailNos(sum).build());
                }
            }
        })
        //这里主要是演示,因此我们打印出来,真实环境中需要把数据写入sink中或者调用第三方接口进行预警等等操作,视具体情况而定。
        .print();
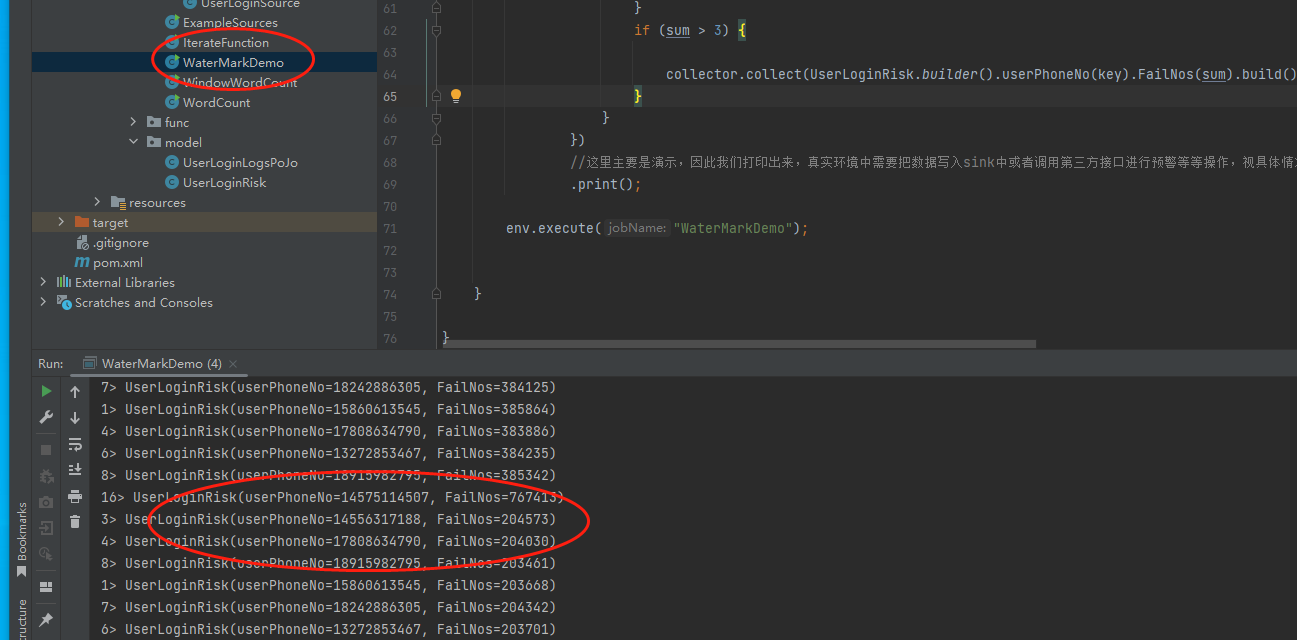
最后我们来运行下整个job任务查看下结果:
可以看到在时间窗口到期之后会对用户进行数据统计,然后打印出来具体的失败次数。
备注:
1、这里我们主要是对用户的登录数据做一次简单的风控演示,在真实的环境中会复杂很多,但是无论如何复杂,复杂的主要是处理逻辑,关于这里的水位线整体思路是不变的。
2、在实际场景中,可能有一些分区是在一段时间内可能是没有新的数据源产生的,此时如果其他分区还在发送数据,那么水位线的处理就会因为上游并行的数据源不一致导致watermark不会出现变化,因此在实际过程中,我们在设置水位线的时候需要添加一个检测空闲数据源的设置,设置方法如下:
WatermarkStrategy.<UserLoginLogsPoJo>forBoundedOutOfOrderness(Duration.ofSeconds(3))
        //定时1分钟检查一次空闲数据源
        .withIdleness(Duration.ofMinutes(1))
        //设置事件时间以登录日志的时间为准
        .withTimestampAssigner((event, timestamp) -> event.getLoginTime()));
也就是添加这里的.withIdleness(Duration.ofMinutes(1))。
最后按照惯例,附上本案例的源码,登录后即可下载。


还没有评论,来说两句吧...