
最近准备做一个 ai 相关的应用,主要使用到 spring ai alibaba 相关的模块,说实话我一直不想介入这个 ai 开发这个模块,主要有几个原因:
1、年龄大了,遇到了瓶颈,现在不想一直吃开发这碗饭
2、现在 ai 相关的工具实在太多了,实在不行我用n8n也可以完成
3、我更关注如何使用 ai 进行变现
但是奈何没办法,只能现在工作相关的需要,所以还得继续撸代码,所以必须要要把 ai 开发这块给拾起来,所以编写这一系列文章。本文主要演示使用 spring ai alibaba 创建一个简单的chatagent,实现与 ai 进行聊天。直接开始。
一、创建 maven 项目
这里我们创建maven 项目,然后配置 ai 相关的依赖即可,这里主要使用的版本是:
jdk21
maven3.8
springboot3
这里我们在 pom 里面添加如下的依赖即可:
<dependency>
    <groupId>org.springframework.boot</groupId>
    <artifactId>spring-boot-starter</artifactId>
</dependency>

<!-- Spring AI Alibaba Agent Framework -->
<dependency>
    <groupId>com.alibaba.cloud.ai</groupId>
    <artifactId>spring-ai-alibaba-agent-framework</artifactId>
    <version>${alibaba-ai.version}</version>
</dependency>

<!-- DashScope ChatModel 支持(如果使用其他模型,请跳转 Spring AI 文档选择对应的 starter) -->
<dependency>
    <groupId>com.alibaba.cloud.ai</groupId>
    <artifactId>spring-ai-alibaba-starter-dashscope</artifactId>
    <version>${alibaba-ai.version}</version>
</dependency>
这里我的完整的 pom 文件示例是:
<?xml version="1.0" encoding="UTF-8"?>
<project xmlns="http://maven.apache.org/POM/4.0.0"
         xmlns:xsi="http://www.w3.org/2001/XMLSchema-instance"
         xsi:schemaLocation="http://maven.apache.org/POM/4.0.0 http://maven.apache.org/xsd/maven-4.0.0.xsd">
    <modelVersion>4.0.0</modelVersion>

    <!-- Spring Boot父依赖,用于统一管理版本 -->
    <parent>
        <groupId>org.springframework.boot</groupId>
        <artifactId>spring-boot-starter-parent</artifactId>
        <version>3.2.0</version>
        <relativePath/> <!-- 从仓库中查找父依赖 -->
    </parent>

    <groupId>com.ai.demo</groupId>
    <artifactId>aidemo</artifactId>
    <version>1.0-SNAPSHOT</version>

    <properties>
        <maven.compiler.source>17</maven.compiler.source>
        <maven.compiler.target>17</maven.compiler.target>
        <project.build.sourceEncoding>UTF-8</project.build.sourceEncoding>
        <alibaba-ai.version>1.1.0.0-RC2</alibaba-ai.version>
    </properties>

    <repositories>
        <repository>
            <id>spring-milestones</id>
            <name>Spring Milestones</name>
            <url>https://repo.spring.io/milestone</url>
            <snapshots>
                <enabled>false</enabled>
            </snapshots>
        </repository>
    </repositories>

    <dependencies>
        <!-- Spring Boot Starter -->
        <dependency>
            <groupId>org.springframework.boot</groupId>
            <artifactId>spring-boot-starter</artifactId>
        </dependency>

        <!-- Spring AI Alibaba Agent Framework -->
        <dependency>
            <groupId>com.alibaba.cloud.ai</groupId>
            <artifactId>spring-ai-alibaba-agent-framework</artifactId>
            <version>${alibaba-ai.version}</version>
        </dependency>

        <!-- DashScope ChatModel 支持(如果使用其他模型,请跳转 Spring AI 文档选择对应的 starter) -->
        <dependency>
            <groupId>com.alibaba.cloud.ai</groupId>
            <artifactId>spring-ai-alibaba-starter-dashscope</artifactId>
            <version>${alibaba-ai.version}</version>
        </dependency>
    </dependencies>

    <build>
        <plugins>
            <plugin>
                <groupId>org.springframework.boot</groupId>
                <artifactId>spring-boot-maven-plugin</artifactId>
            </plugin>
        </plugins>
    </build>
</project>
二、创建配置文件
接下来我们需要使用配置文件application.yml,这里我们配置对应的 ai api key 即可,示例如下:
# application.yml
spring:
  main:
    web-application-type: none  # 配置为非Web应用
  ai:
    dashscope:
      api-key: 阿里百炼的 key
三、编写 chatagent
这里我们不使用 web 项目,所以这里我们把chat agent 的代码直接写在 application 里面即可,所以我这里完整的示例代码是:
package com.ai.demo;
import org.springframework.boot.SpringApplication;
import org.springframework.boot.autoconfigure.SpringBootApplication;
import org.springframework.ai.chat.model.ChatModel;
import org.springframework.ai.chat.client.ChatClient;
import org.springframework.ai.chat.messages.UserMessage;
import org.springframework.ai.chat.model.ChatResponse;
import org.springframework.boot.CommandLineRunner;
import org.springframework.context.annotation.Bean;
import org.springframework.ai.model.function.FunctionCallback;
import java.util.HashMap;
import java.util.Map;
import java.util.function.Function;
@SpringBootApplication
public class AiDemoApplication {
public static void main(String[] args) {
// 启动Spring Boot应用
SpringApplication.run(AiDemoApplication.class, args);
}
@Bean
public CommandLineRunner commandLineRunner(ChatModel chatModel) {
return args -> {
System.out.println("Spring Boot应用启动成功!");
System.out.println("已自动配置ChatModel: " + chatModel.getClass().getSimpleName());
// 检查是否设置了API密钥
String apiKey = "123456";
if (apiKey == null || apiKey.trim().isEmpty()) {
System.out.println("\n⚠️ 警告: 未检测到 AI_DASHSCOPE_API_KEY 环境变量");
System.out.println("💡 请先设置API密钥,然后重新运行:");
System.out.println(" export AI_DASHSCOPE_API_KEY='your_actual_api_key'");
System.out.println("\n📋 以下是AI Agent的功能演示:");
System.out.println(" - 使用DashScope作为LLM提供者");
System.out.println(" - 支持工具调用(如天气查询)");
System.out.println(" - 可构建复杂的AI Agent");
} else {
// 创建带有工具的ChatClient
ChatClient chatClient = ChatClient.builder(chatModel)
.defaultSystem("你是一个有用的助手,可以帮助用户查询天气等信息。")
.build();
// 模拟一个简单的交互
System.out.println("\n🤖 AI Agent正在运行...");
// 如果API密钥有效,则可以执行实际的AI调用
try {
String response = chatClient
.prompt()
.user("你好,请介绍一下你自己,并告诉我今天成都的天气如何?")
.call()
.content();
System.out.println("\nAI回应: " + response);
} catch (Exception e) {
System.out.println("\n⚠️ API调用出现错误 (可能API密钥无效): " + e.getMessage());
}
}
System.out.println("\n🎉 AI Agent Demo已完成初始化");
};
}
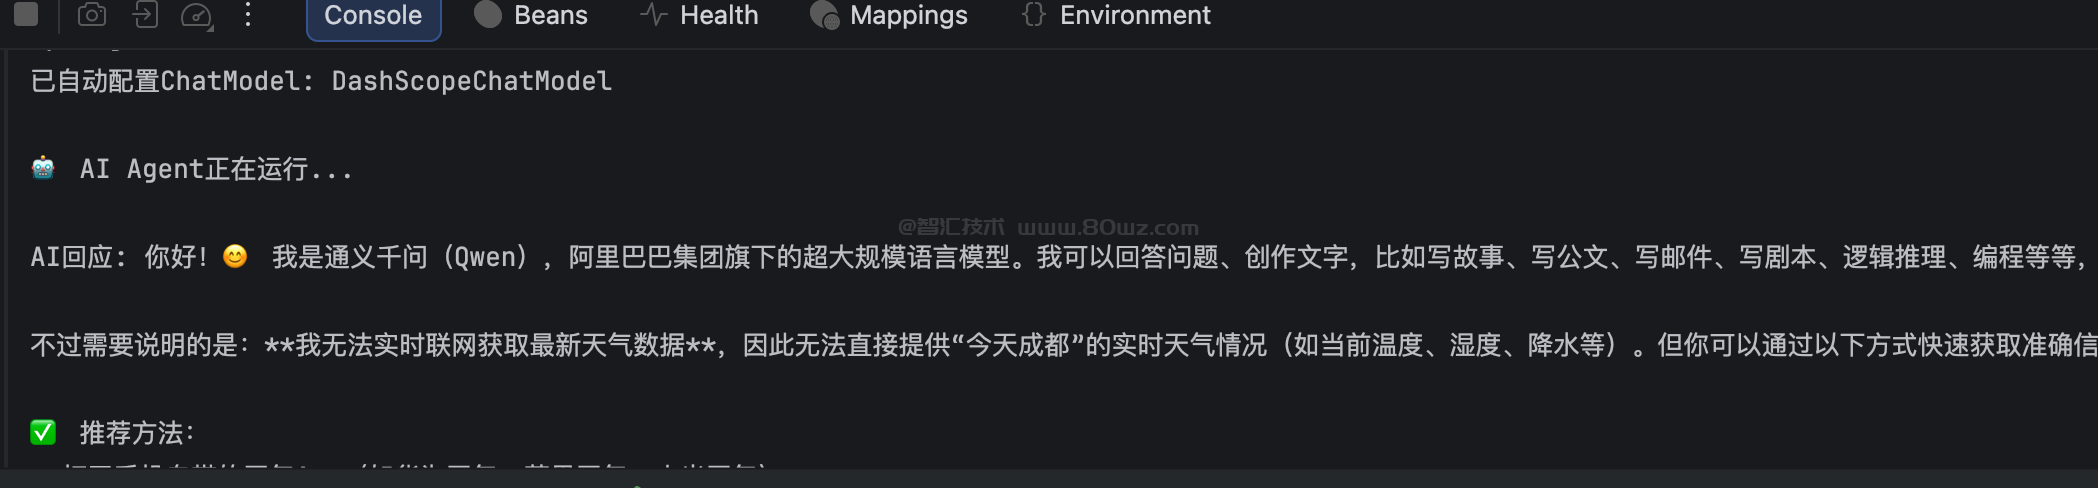
}然后我们启动项目即可,运行之后可以看到控制台就打印出来了 ai 的回应,示例如下:
备注:
1、本人仅是做个初步的演示,所以整体代码非常简单,直接可以直接把上面的示例代码复制到你的项目就可以运行。
2、本系列主要是演示 spring ai alibaba 的基础功能开发,如果要实际开发的话,还得根据自己的实际情况来进行选择。


还没有评论,来说两句吧...