
在dolphinscheduler系列里面我们还有一个常用的没有介绍到的就是spark了,这篇文章我们介绍下spark的单机版本安装。下面直接开始。
一、下载spark最新版本
要想安装spark,我们首先需要去下载一个最新版本的spark,因此这里我们可以从spark的官网里面下载,下载地址是:spark官网下载。这里我们下载的是最新版的,版本是:spark-3.4.0-bin-hadoop3。下载完毕之后,上传到服务器并且解压。
二、配置服务器的ssh免密码登录
这里我们跳过,因为在本站介绍的比较多了。
三、配置环境变量
这里我们和前面的文章是一样的,需要编辑/etc/profile文件,把spark的环境变量配置进去,这里我们演示环境的完整内容如下:
export JAVA_HOME=/usr/local/jdk1.8.0_271
export HADOOP_HOME=/home/pubserver/hadoop-3.3.5
export HBASE_HOME=/home/pubserver/hbase-2.5.3
export HIVE_HOME=/home/pubserver/hive3.1.3
export FLINK_HOME=/home/pubserver/flink-1.17.0
export SPARK_HOME=/home/pubserver/spark-3.4.0-bin-hadoop3
export PATH=$PATH:$JAVA_HOME/bin:$HADOOP_HOME/bin:${HBASE_HOME}/bin:${HIVE_HOME}/bin:${FLINK_HOME}/bin:${SPARK_HOME}/bin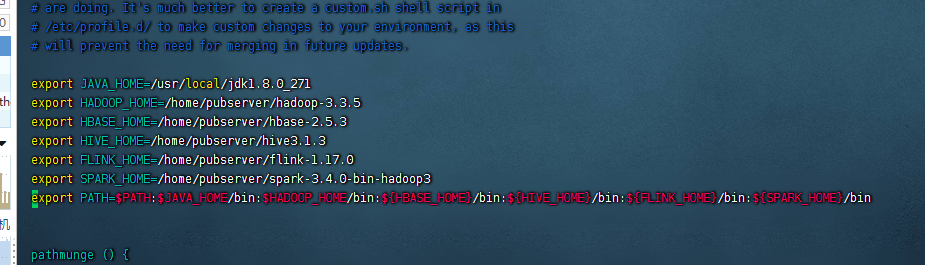
四、配置spark
这里我们就来配置下spark的信息,配置spark主要会涉及到两个文件,分别是:
spark-env.sh
slaves
首先我们创建下这两个文件
cp -r spark-env.sh.template spark-env.sh
cp -r workers.template slaves
此时这两个文件就创建了

首先我们编辑spark-env.sh这个文件,把如下的内容复制进去
#!/usr/bin/env bash

#
# Licensed to the Apache Software Foundation (ASF) under one or more
# contributor license agreements.  See the NOTICE file distributed with
# this work for additional information regarding copyright ownership.
# The ASF licenses this file to You under the Apache License, Version 2.0
# (the "License"); you may not use this file except in compliance with
# the License.  You may obtain a copy of the License at
#
#    http://www.apache.org/licenses/LICENSE-2.0
#
# Unless required by applicable law or agreed to in writing, software
# distributed under the License is distributed on an "AS IS" BASIS,
# WITHOUT WARRANTIES OR CONDITIONS OF ANY KIND, either express or implied.
# See the License for the specific language governing permissions and
# limitations under the License.
#

# This file is sourced when running various Spark programs.
# Copy it as spark-env.sh and edit that to configure Spark for your site.

# Options read when launching programs locally with
# ./bin/run-example or ./bin/spark-submit
# - HADOOP_CONF_DIR, to point Spark towards Hadoop configuration files
#hadoop的环境变量
export HADOOP_CONF_DIR=/home/pubserver/hadoop-3.3.5/etc/hadoop
# - SPARK_LOCAL_IP, to set the IP address Spark binds to on this node
# - SPARK_PUBLIC_DNS, to set the public dns name of the driver program

# Options read by executors and drivers running inside the cluster
# - SPARK_LOCAL_IP, to set the IP address Spark binds to on this node
# - SPARK_PUBLIC_DNS, to set the public DNS name of the driver program
# - SPARK_LOCAL_DIRS, storage directories to use on this node for shuffle and RDD data
# - MESOS_NATIVE_JAVA_LIBRARY, to point to your libmesos.so if you use Mesos

# Options read in any mode
# - SPARK_CONF_DIR, Alternate conf dir. (Default: ${SPARK_HOME}/conf)
export SPARK_HOME=/home/pubserver/spark-3.4.0-bin-hadoop3
# - SPARK_EXECUTOR_CORES, Number of cores for the executors (Default: 1).
# - SPARK_EXECUTOR_MEMORY, Memory per Executor (e.g. 1000M, 2G) (Default: 1G)
# - SPARK_DRIVER_MEMORY, Memory for Driver (e.g. 1000M, 2G) (Default: 1G)

# Options read in any cluster manager using HDFS
# - HADOOP_CONF_DIR, to point Spark towards Hadoop configuration files

# Options read in YARN client/cluster mode
# - YARN_CONF_DIR, to point Spark towards YARN configuration files when you use YARN
export JAVA_HOME=/usr/local/jdk1.8.0_271
export YARN_CONF_DIR=/home/pubserver/hadoop-3.3.5/etc/hadoop
# Options for the daemons used in the standalone deploy mode
# - SPARK_MASTER_HOST, to bind the master to a different IP address or hostname
export SPARK_MASTER_HOST=node1
export SPARK_MASTER_IP=node1
# - SPARK_MASTER_PORT / SPARK_MASTER_WEBUI_PORT, to use non-default ports for the master
export SPARK_MASTER_WEBUI_PORT=8090
export SPARK_MASTER_PORT=7077
# - SPARK_MASTER_OPTS, to set config properties only for the master (e.g. "-Dx=y")
# - SPARK_WORKER_CORES, to set the number of cores to use on this machine
# - SPARK_WORKER_MEMORY, to set how much total memory workers have to give executors (e.g. 1000m, 2g)
export SPARK_WORKER_MEMORY=8g
export SPARK_WORKER_CORES=4

# - SPARK_WORKER_PORT / SPARK_WORKER_WEBUI_PORT, to use non-default ports for the worker
# - SPARK_WORKER_DIR, to set the working directory of worker processes
# - SPARK_WORKER_OPTS, to set config properties only for the worker (e.g. "-Dx=y")
# - SPARK_DAEMON_MEMORY, to allocate to the master, worker and history server themselves (default: 1g).
# - SPARK_HISTORY_OPTS, to set config properties only for the history server (e.g. "-Dx=y")
# - SPARK_SHUFFLE_OPTS, to set config properties only for the external shuffle service (e.g. "-Dx=y")
# - SPARK_DAEMON_JAVA_OPTS, to set config properties for all daemons (e.g. "-Dx=y")

# - SPARK_DAEMON_CLASSPATH, to set the classpath for all daemons
# - SPARK_PUBLIC_DNS, to set the public dns name of the master or workers

# Options for launcher
# - SPARK_LAUNCHER_OPTS, to set config properties and Java options for the launcher (e.g. "-Dx=y")

export HADOOP_HOME=/home/pubserver/hadoop-3.3.5

export MASTER=spark://node1:7077

# Generic options for the daemons used in the standalone deploy mode
# - SPARK_CONF_DIR      Alternate conf dir. (Default: ${SPARK_HOME}/conf)
# - SPARK_LOG_DIR       Where log files are stored.  (Default: ${SPARK_HOME}/logs)
# - SPARK_LOG_MAX_FILES Max log files of Spark daemons can rotate to. Default is 5.
# - SPARK_PID_DIR       Where the pid file is stored. (Default: /tmp)
export SPARK_PID_DIR=/home/pubserver/spark-3.4.0-bin-hadoop3/pids
# - SPARK_IDENT_STRING  A string representing this instance of spark. (Default: $USER)
# - SPARK_NICENESS      The scheduling priority for daemons. (Default: 0)
# - SPARK_NO_DAEMONIZE  Run the proposed command in the foreground. It will not output a PID file.
# Options for native BLAS, like Intel MKL, OpenBLAS, and so on.
# You might get better performance to enable these options if using native BLAS (see SPARK-21305).
# - MKL_NUM_THREADS=1        Disable multi-threading of Intel MKL
# - OPENBLAS_NUM_THREADS=1   Disable multi-threading of OpenBLAS

# Options for beeline
# - SPARK_BEELINE_OPTS, to set config properties only for the beeline cli (e.g. "-Dx=y")
# - SPARK_BEELINE_MEMORY, Memory for beeline (e.g. 1000M, 2G) (Default: 1G)

##zookeeper+spark高可用 ,没有装zookeeper的下边可以不配置
export SPARK_DAEMON_JAVA_OPTS="
-Dspark.deploy.recoveryMode=ZOOKEEPER
-Dspark.deploy.zookeeper.url=node1
-Dspark.deploy.zookeeper.dir=/spark"
在初始状态的文件里面没有任何配置,全部是使用#号给分割开的,这里我们我们把所有export的内容都粘贴到spark-env.sh这个文件中去。
然后再配置slave,这里我们是单机,所以master是node1这台服务器,slave也是node2这台服务器。所以我们编辑slaves这个文件,把node1添加进去
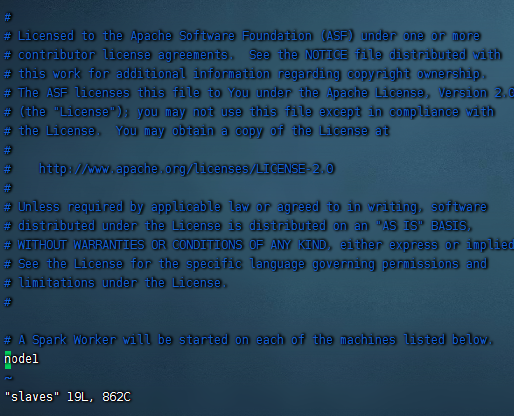
这里原本有一个localhost,我们把他给去掉下,添加上node1,如果有其他的服务,也添加进去。
以上我们的spark单机版本就配置完了。
五、启动spark
配置完毕之后,我们就来启动下spark
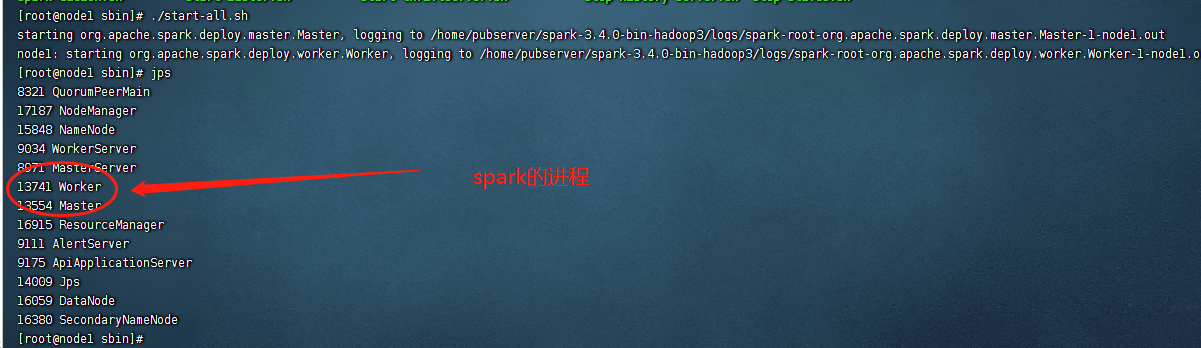
cd /home/pubserver/spark-3.4.0-bin-hadoop3/sbin/
./start-all.sh

启动之后,会在服务器上出现两个进程,分别是:
Master
Worker
使用jps命令即可看到
六、测试spark
这里的话我们启动后需要测试下spark,第一项测试,我们访问下8089 web ui的端口
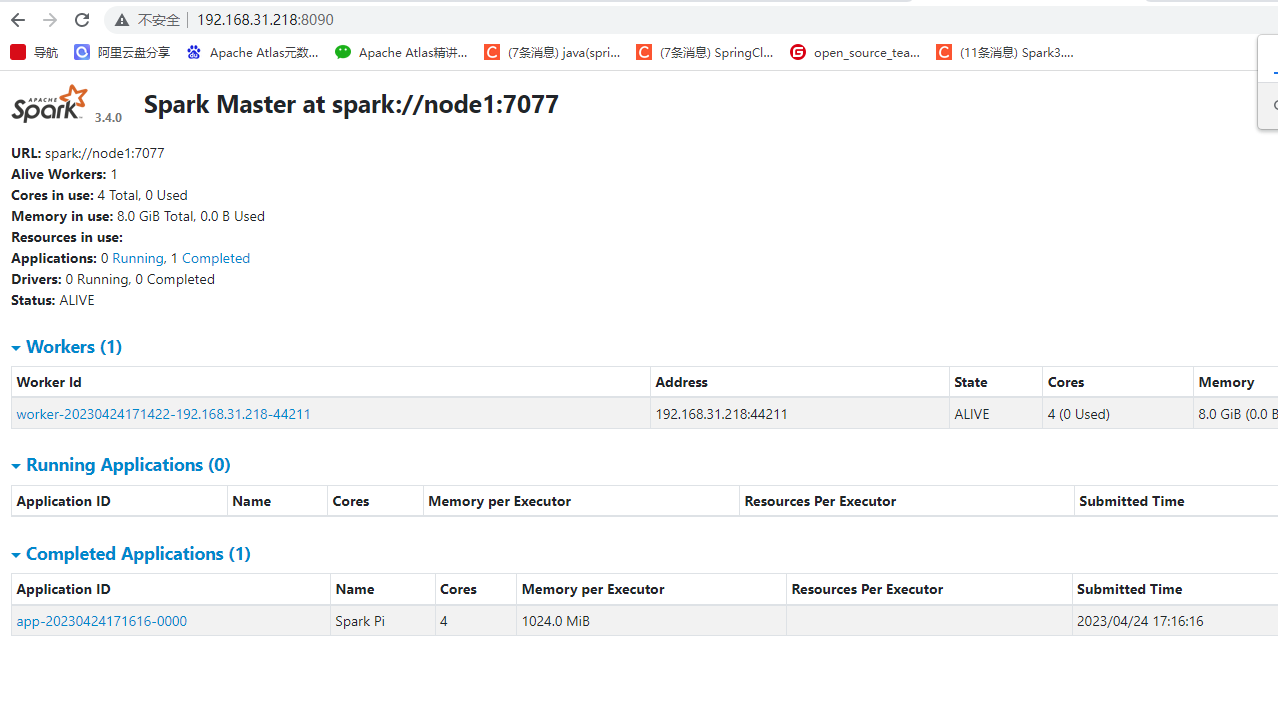
可以看到访问没有任何问题。
我们再测试下spark自带的example程序,这里我们以计算pi来看,执行如下的命令
cd /home/pubserver/spark-3.4.0-bin-hadoop3/examples/jars

spark-submit --master spark://node1:7077 --class org.apache.spark.examples.SparkPi spark-examples_2.12-3.4.0.jar 12
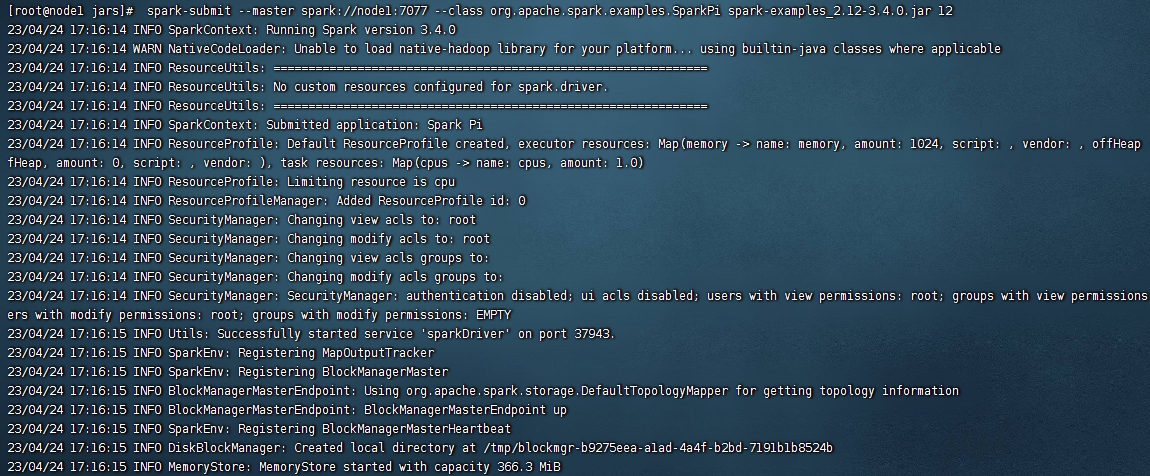
运行没有任何问题,运行后在web上可以看到对应的任务:

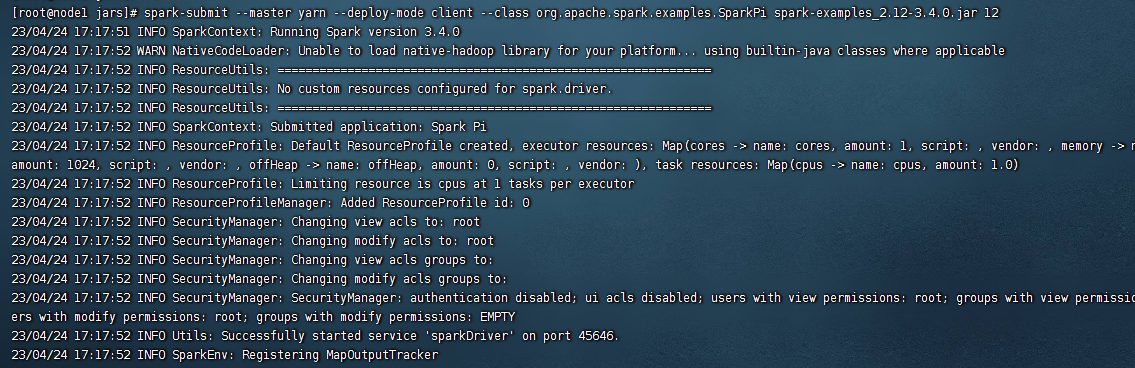
我们再测试下提交到yarn上运行,使用如下的命令:
cd /home/pubserver/spark-3.4.0-bin-hadoop3/examples/jars

spark-submit --master yarn --deploy-mode client --class org.apache.spark.examples.SparkPi spark-examples_2.12-3.4.0.jar 12
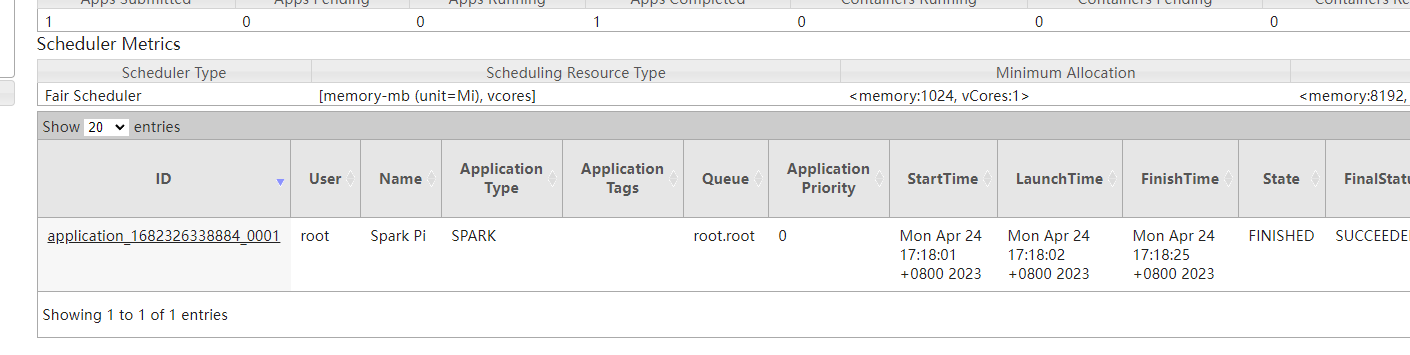
运行之后,我们可以在hadoop的yarn上看到这里的job任务
以上我们的spark就安装完毕了。
备注:
1、这里我们的安装方式是按照集群的模式来安装单机版本的,如果需要扩展集群,只需要配置ssh免密码登录和更改slaves文件接口。
2、在spark集群上提交的任务,执行之后会在spark的web ui上看到。
3、向yarn提交spark任务的话,任务执行情况在spark的web ui上是看不到的,只能在hadoop的yarn上查看到。


还没有评论,来说两句吧...