
在现实项目中,elasticsearch的使用频率是非常高的。大型的项目中都离不开elasticsearch。我们知道在elasticsearch中,他的分片数量是在最开始创建index的时候就会设置好,已经设置就不能被修改。后期如果数据量大的话,我们一般会进行重建索引。这个工作也是一个不小的工作量。
但是在某些业务场景里面,数据量会很大,但是我们也不会经常使用到,那这个时候,我们重建索引就没有太大的必要。我们只需要把不使用的数据放在冷备机器上,让热的数据还是保持在高性能的服务器上供业务使用即可。这就是今天给大家介绍的冷热数据架构。
这里我们给大家演示一下全部过程。还是基于《Elasticsearch介绍(二)Elasticsearch 集群安装》安装的两台服务器来进行操作。这里我们回顾下之前的集群
| 序号 | 节点 | ip |
| 1 | node-1 | 192.168.31.20 |
| 2 | node-2 | 192.168.31.30 |
现在我们需要进行规划一下,把node-1做成是热节点,所有活跃的数据都保存在node-1上,把node-2节点做成冷备份节点,所有的冷数据备份都保存早node-2节点上。具体规划如下
| 序号 | 节点 | ip | 角色 |
| 1 | node-1 | 192.168.31.20 | 热节点 |
| 2 | node-2 | 192.168.31.30 | 冷节点 |
配置冷热节点主要和以下几点因素相关:
1、在elasticsearch的服务端配置文件里面添加冷热配置的节点
2、在创建的index上定义热节点存储。
3、通过api把index的数据迁移到冷接点存储。
好了,下面开始实战!
一、修改服务器端的配置
1)在192.168.31.20的elasticsearch的节点上添加配置:
node.attr.rack: r1
node.attr.box_type: hot
此时192.168.31.20上elasticsearch.yml的完整配置是:
# ======================== Elasticsearch Configuration =========================
#
# NOTE: Elasticsearch comes with reasonable defaults for most settings.
#       Before you set out to tweak and tune the configuration, make sure you
#       understand what are you trying to accomplish and the consequences.
#
# The primary way of configuring a node is via this file. This template lists
# the most important settings you may want to configure for a production cluster.
#
# Please consult the documentation for further information on configuration options:
# https://www.elastic.co/guide/en/elasticsearch/reference/index.html
#
# ---------------------------------- Cluster -----------------------------------
#
# Use a descriptive name for your cluster:
#集群名, 同一集群节点的集群名应该一致
cluster.name: es-cluster
#
# ------------------------------------ Node ------------------------------------
#
# Use a descriptive name for the node:
#
# 节点名, 每个节点名应该不同
node.name: node-1

# 跨域相关配置
http.cors.enabled: true
http.cors.allow-origin: "*"

#
# Add custom attributes to the node:
#
#node.attr.rack: r1
#
# ----------------------------------- Paths ------------------------------------
#
# Path to directory where to store the data (separate multiple locations by comma):
#
path.data: /mnt/elasticsearch-7.7.0/data
#
# Path to log files:
#
path.logs: /mnt/elasticsearch-7.7.0/logs
#
# ----------------------------------- Memory -----------------------------------
#
# Lock the memory on startup:
#
#bootstrap.memory_lock: true
#
# Make sure that the heap size is set to about half the memory available
# on the system and that the owner of the process is allowed to use this
# limit.
#
# Elasticsearch performs poorly when the system is swapping the memory.
#
# ---------------------------------- Network -----------------------------------
#
# Set the bind address to a specific IP (IPv4 or IPv6):
#
network.host: 192.168.31.20
#
# Set a custom port for HTTP:
#
#http.port: 9200
#
# For more information, consult the network module documentation.
#
# --------------------------------- Discovery ----------------------------------
#
# Pass an initial list of hosts to perform discovery when this node is started:
# The default list of hosts is ["127.0.0.1", "[::1]"]
#所有节点 hosts
discovery.seed_hosts: ["192.168.31.20", "192.168.31.30"]
#
# Bootstrap the cluster using an initial set of master-eligible nodes:
#
cluster.initial_master_nodes: ["node-1","node-2"]
#
# For more information, consult the discovery and cluster formation module documentation.
#
# ---------------------------------- Gateway -----------------------------------
#
# Block initial recovery after a full cluster restart until N nodes are started:
#
#gateway.recover_after_nodes: 3
#
# For more information, consult the gateway module documentation.
#
# ---------------------------------- Various -----------------------------------
#
# Require explicit names when deleting indices:
#
#action.destructive_requires_name: true

# 代表有资格竞争 master
node.master: true
# 代表为数据节点
node.data: true
node.attr.rack: r1
node.attr.box_type: hot
1)在192.168.31.30的elasticsearch的节点上添加配置:
node.attr.rack: r9
node.attr.box_type: cool
此时192.168.31.20上elasticsearch.yml的完整配置是:
# ======================== Elasticsearch Configuration =========================
#
# NOTE: Elasticsearch comes with reasonable defaults for most settings.
#       Before you set out to tweak and tune the configuration, make sure you
#       understand what are you trying to accomplish and the consequences.
#
# The primary way of configuring a node is via this file. This template lists
# the most important settings you may want to configure for a production cluster.
#
# Please consult the documentation for further information on configuration options:
# https://www.elastic.co/guide/en/elasticsearch/reference/index.html
#
# ---------------------------------- Cluster -----------------------------------
#
# Use a descriptive name for your cluster:
#集群名, 同一集群节点的集群名应该一致
cluster.name: es-cluster
#
# ------------------------------------ Node ------------------------------------
#
# Use a descriptive name for the node:
#
# 节点名, 每个节点名应该不同
node.name: node-2

# 跨域相关配置
http.cors.enabled: true
http.cors.allow-origin: "*"

#
# Add custom attributes to the node:
#
#node.attr.rack: r1
#
# ----------------------------------- Paths ------------------------------------
#
# Path to directory where to store the data (separate multiple locations by comma):
#
path.data: /mnt/elasticsearch-7.7.0/data
#
# Path to log files:
#
path.logs: /mnt/elasticsearch-7.7.0/logs
#
# ----------------------------------- Memory -----------------------------------
#
# Lock the memory on startup:
#
#bootstrap.memory_lock: true
#
# Make sure that the heap size is set to about half the memory available
# on the system and that the owner of the process is allowed to use this
# limit.
#
# Elasticsearch performs poorly when the system is swapping the memory.
#
# ---------------------------------- Network -----------------------------------
#
# Set the bind address to a specific IP (IPv4 or IPv6):
#
network.host: 192.168.31.30
#
# Set a custom port for HTTP:
#
#http.port: 9200
#
# For more information, consult the network module documentation.
#
# --------------------------------- Discovery ----------------------------------
#
# Pass an initial list of hosts to perform discovery when this node is started:
# The default list of hosts is ["127.0.0.1", "[::1]"]
#所有节点 hosts
discovery.seed_hosts: ["192.168.31.20", "192.168.31.30"]
#
# Bootstrap the cluster using an initial set of master-eligible nodes:
#
cluster.initial_master_nodes: ["node-1","node-2"]
#
# For more information, consult the discovery and cluster formation module documentation.
#
# ---------------------------------- Gateway -----------------------------------
#
# Block initial recovery after a full cluster restart until N nodes are started:
#
#gateway.recover_after_nodes: 3
#
# For more information, consult the gateway module documentation.
#
# ---------------------------------- Various -----------------------------------
#
# Require explicit names when deleting indices:
#
#action.destructive_requires_name: true

# 代表有资格竞争 master
node.master: true
# 代表为数据节点
node.data: true
node.attr.rack: r9
node.attr.box_type: cool
然后我们把这两台服务器进行下重启,重启完后,我们通过head可以看到

二、创建一个index的索引
这里我们不写api了,直接通过head的插件进行处理
put /test

{
  "settings": {
    "number_of_shards": 3,
    "number_of_replicas": 1,
    "refresh_interval": "10s",
    "index.routing.allocation.require.box_type": "hot"
  },
  "mappings": {
    "properties": {
      "username": {
        "type": "keyword"
      },
      "password": {
        "type": "text"
      }
    }
  }
}
上面的settings里面我们定义了3个分片,副本是1个,routing是hot

这时候我们看下具体的分片
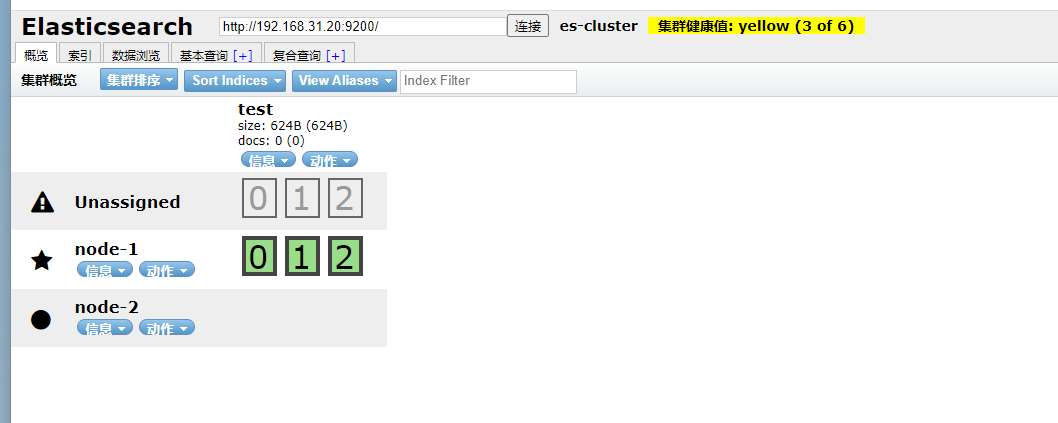
看到了吗?集群变成了不健康的状态,但是我们这个是正常的,在这里给大家解释下:
1:由于我们的整个集群只有2台服务器,我们设置的副本是1,同时定义到了hot,我们在配置的集群里面一台是hot,一台是cool,所以hot只有一台,没法满足多一个副本,如果集群有多的机器,hot超过2个,则上面就不会报错。
2:在setting的时候,我们的这个test的index是要保存在hot的,node-2是cool的角色,所以他不会在cool角色的服务器上创建副本。
综上出现上诉问题是正常的。
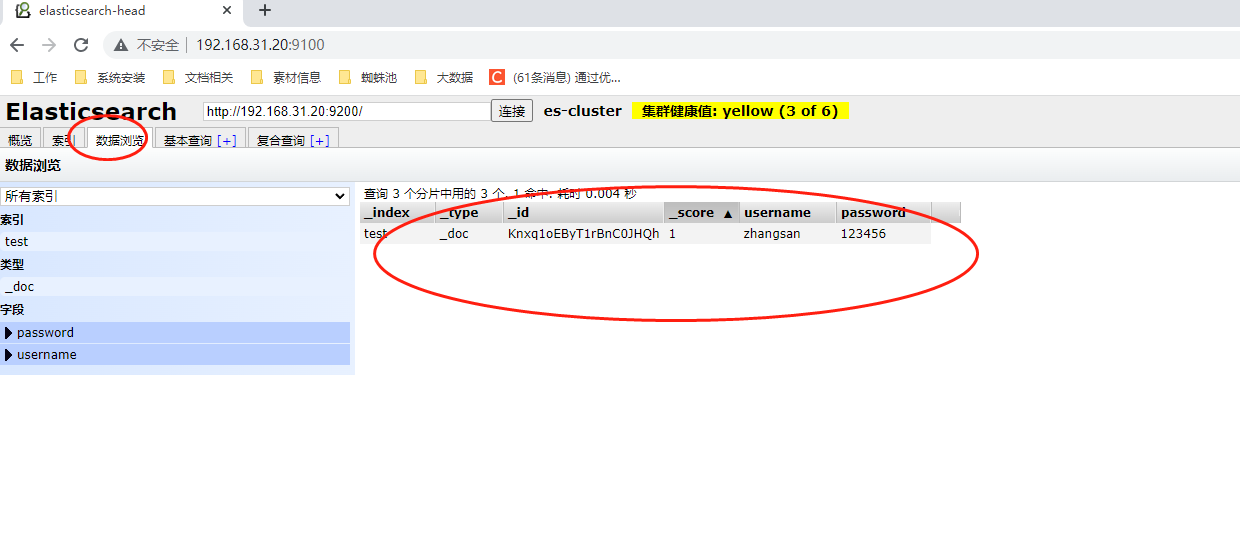
三、向index上写入数据
post /test/_doc

{
  "username": "zhangsan",
  "password": "123456"
}
通过head插件的写入数据是:

然后我们可以看到数据进去了。
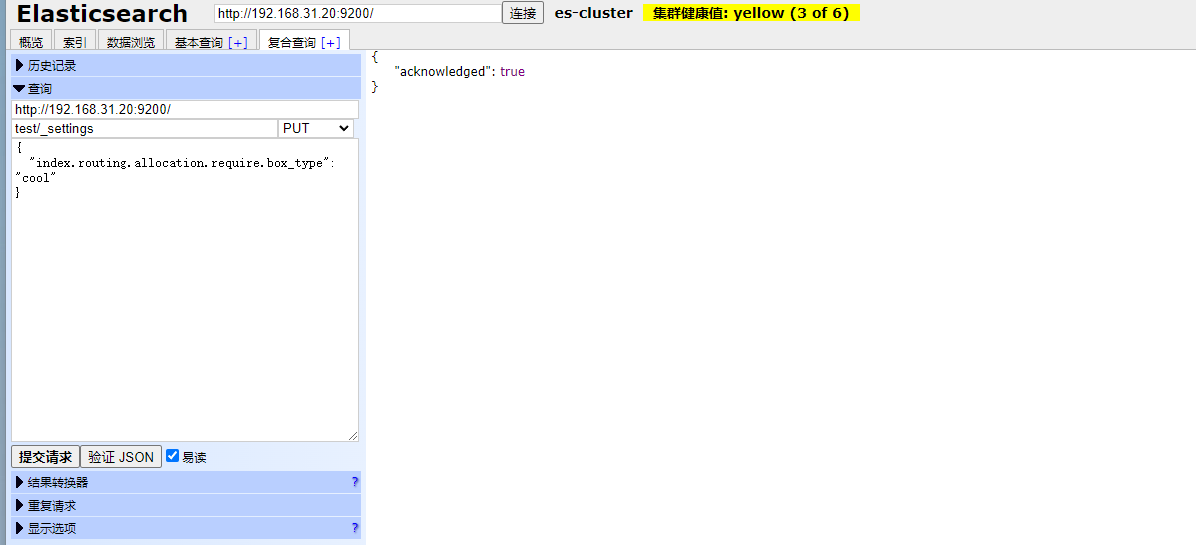
四、让index把数据写入cool角色的服务器
PUT test/_settings
{
    "index.routing.allocation.require.box_type":"cool"
}
使用head插件的方式操作
这时候我们看下分片的情况
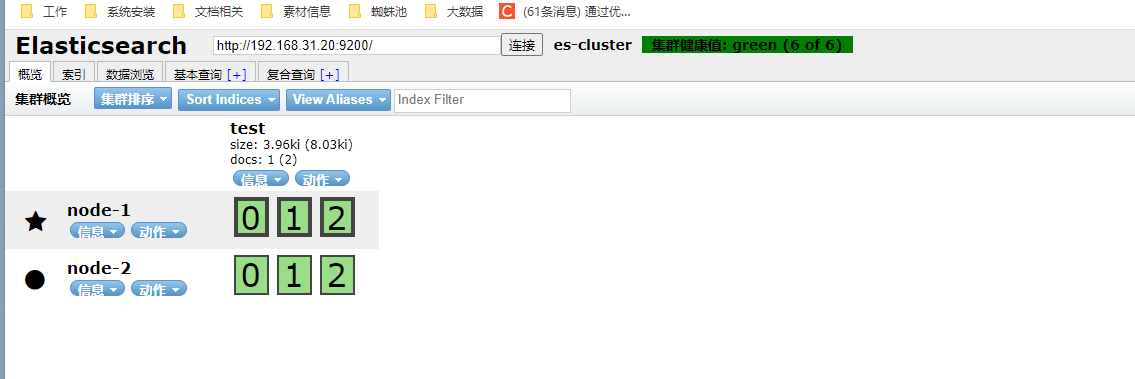
是不是就正常了,这里由于我们只有2台机器进行演示,如果条件允许的话,在多角色的话,就可以看到数据都进去了cool角色的服务器上了。
总结下:
1、elasticsearch的冷热数据架构在数据分析类的项目中还是比较常见的。
2、elasticsearch的冷热数据架构在数据不用的时候,我们需要使用api进行迁移,这个迁移可以用curl,也可以使用javaapi,一般在生产环境里面我们会搭配crontab或者调度器进行调用。
3、在生产上使用的话,我们一般不会直接使用这种test这种index,一般都是 test-2022-07-* 这样的index,主要是确保进行分配指定条件的数据进入cool服务器进行存储,把高性能的服务器应用于在线的业务。


还没有评论,来说两句吧...