
在前面的文章《实战Spring Cloud Oauth2系列(五)实现多客户端登录》我们介绍了实现多客户端登录的功能,在实际的场景里面我们应该有见识过,例如微信,他可以同时支持手机端登录和电脑端登录,这就是同一个账号实现多端登录的原理。但是我们还会发现一个场景,就是微信在A手机上登录了之后,再去B手机上登录,此时B手机上登录成功之后,A手机上的登录就会被挤掉。这也就是我们这篇文章的核心主题-实现单端登录并且踢掉老登录的效果。
其实实现这个单端登录并且踢掉老登录的流程非常简单,我们画个流程图:
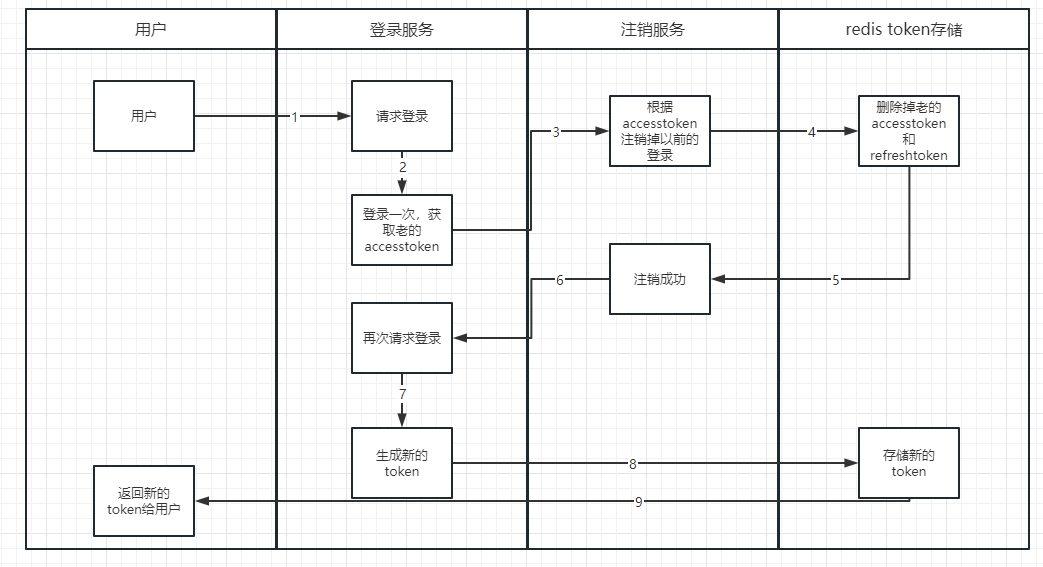
所以说这里我们了解了这个流程之后,就知道应该怎么办了,接下来我们直接实操,这里我们还是更改之前的OauthController代码。
下面是OauthController的完整代码:
package org.shop.oauth.server.controller;

import java.security.Principal;
import java.util.Map;

import org.shop.common.model.http.BaseResponse;
import org.shop.oauth.server.service.AccessTokenService;
import org.springframework.beans.factory.annotation.Autowired;
import org.springframework.web.bind.annotation.PostMapping;
import org.springframework.web.bind.annotation.RequestHeader;
import org.springframework.web.bind.annotation.RequestMapping;
import org.springframework.web.bind.annotation.RequestParam;
import org.springframework.web.bind.annotation.RestController;

import com.alibaba.fastjson.JSON;

import lombok.extern.slf4j.Slf4j;

@RestController
@RequestMapping("/oauth")
@Slf4j
public class OauthController {

	@Autowired
	private AccessTokenService accessTokenService;

	/**
	 * 重写/oauth/token这个默认接口,返回的数据格式统一
	 * @throws Exception
	 */
	@PostMapping(value = "/token")
	public BaseResponse postAccessToken(Principal principal, @RequestParam Map<String, String> parameters)
			throws Exception {
		//备注,在这里的话,我们能判断出来用户账户密码错误,用户状态,权限等信息。在这里判断的话,就不需要唉service中抛出具体的错误信息了。
		log.info("登录获取到的传递参数是:{}",JSON.toJSONString(parameters));
		return accessTokenService.createNewToken(principal,parameters);
	}


	/**
	 * 重写/oauth/token这个默认接口,返回的数据格式统一
	 * @throws Exception
	 */
	@PostMapping(value = "/logout")
	public BaseResponse logout(@RequestHeader String accessToken)
			throws Exception {
		log.info("用户退出接口的传递参数是:{}",JSON.toJSONString(accessToken));

		return accessTokenService.logout(accessToken);
	}

}
这里主要做两个事情,一个是登录接口,一个是退出接口,逻辑我们使用AccessTokenService来进行处理。这里的AccessTokenService是我们自定义的,不是框架自带的。AccessTokenService完整代码如下:
package org.shop.oauth.server.service.impl;

import java.security.Principal;
import java.util.Map;

import org.shop.common.model.http.BaseResponse;
import org.shop.oauth.server.service.AccessTokenService;
import org.springframework.beans.factory.annotation.Autowired;
import org.springframework.security.oauth2.common.OAuth2AccessToken;
import org.springframework.security.oauth2.common.OAuth2RefreshToken;
import org.springframework.security.oauth2.provider.endpoint.TokenEndpoint;
import org.springframework.security.oauth2.provider.token.store.redis.RedisTokenStore;
import org.springframework.stereotype.Service;

import lombok.extern.slf4j.Slf4j;

@Service
@Slf4j
public class AccessTokenServiceImpl implements AccessTokenService {

	@Autowired
    private TokenEndpoint tokenEndpoint;

	@Autowired
    private RedisTokenStore tokenStore;


	@Override
	public BaseResponse createNewToken(Principal principal, Map<String, String> parameters) throws Exception {

		//重新登录一遍
		OAuth2AccessToken accessToken = tokenEndpoint.postAccessToken(principal, parameters).getBody();
		//获取登录后的token
		String token = accessToken.getValue();
		//把这个token从redis中给删除掉即可。
		this.logoutAccessToken(token);
		//再重新登录生成新的token
		OAuth2AccessToken newAccessToken = tokenEndpoint.postAccessToken(principal, parameters).getBody();
		return BaseResponse.ok(newAccessToken);
	}


	/**
	 * 这里主要是相当于注销登录的功能,把token从redis中给删除掉
	 * @param token
	 */
	private void logoutAccessToken(String token) throws Exception{
		log.info("准备注销");
		//读取相关token的信息
		OAuth2AccessToken accessToken = tokenStore.readAccessToken(token);
		if(null != accessToken) {
			//注销掉用户的token
			tokenStore.removeAccessToken(accessToken);
			//获取用户的refreshtoken
			OAuth2RefreshToken refreshToken = accessToken.getRefreshToken();
			//注销掉refreshtoken
			tokenStore.removeRefreshToken(refreshToken);
			log.info("注销成功");
		}
	}


	@Override
	public BaseResponse logout(String accessToken) throws Exception {
		this.logoutAccessToken(accessToken);
		return BaseResponse.ok();
	}

}
详细的流程我们已经在代码的注释里面写了,因此这里的话,我们就不再多做解释,然后我们运行下看看效果:
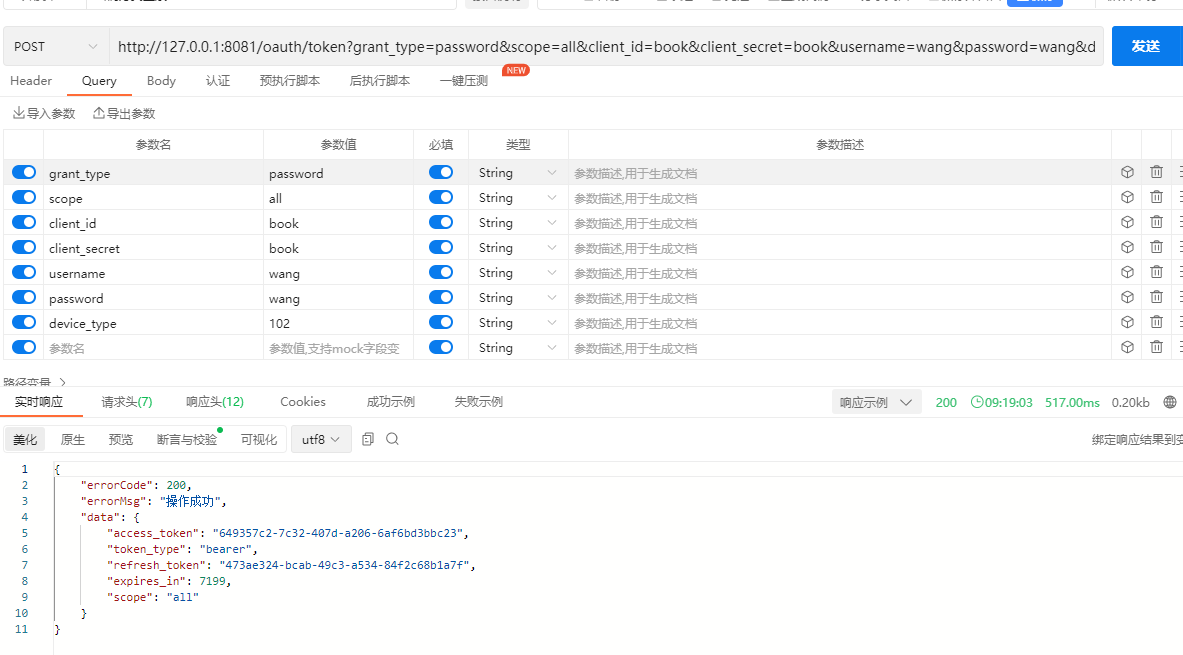
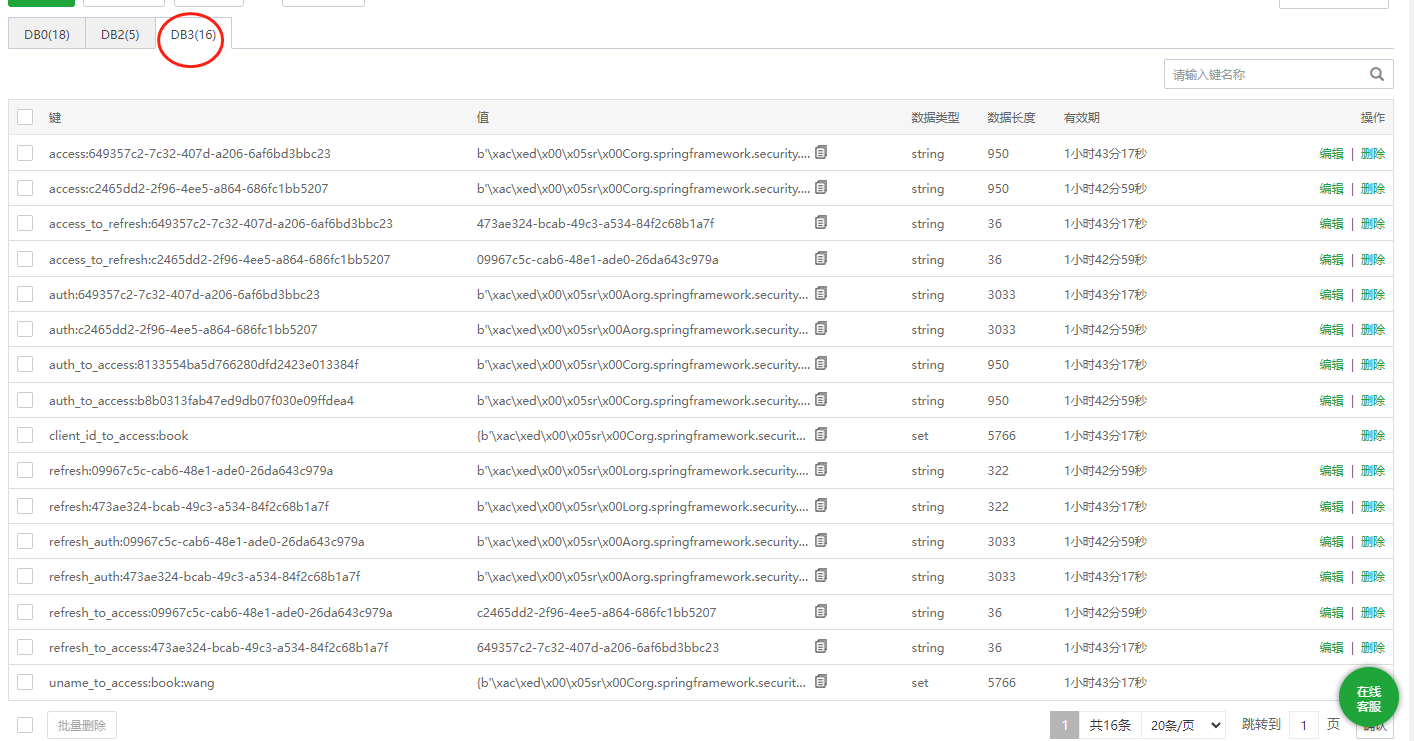
可以看到每次登录之后,这里的access_token和refresh_token都会变,并且同一个用户在多端登录也不会有影响:
最后按照惯例,附上本案例的源码,登录后即可下载。


还没有评论,来说两句吧...