
上一篇我们介绍了flink流处理的第一个demo,即wordcount。同时我们也演示了把job任务提交到flink的standalone集群里面。这篇文章我们介绍下如何安装部署flink的standalone集群。
一、准备3台服务器,角色为1master,2work。
| 序号 | ip | 角色 |
| 1 | 172.22.32.5 | node1(master) |
| 2 | 172.22.32.11 | node2(work1) |
| 3 | 172.22.32.7 | node3(work2) |
二、从官网下载flink的安装包
这里flink的官网下载地址页面是:https://flink.apache.org/downloads.html
这里我们下载的是目前为止的最新版本,版本号是:1.16.0版本

三、配置flink的文件
在flink的安装包里面,所有的配置文件都在${apche_flink_home}/conf目录下

我们主要涉及的配置文件主要有3个,分别是:
1、flink-conf.yaml
2、masters
3、workers
这三个文件主要的配置内容有:
1)flink-conf.yaml修改项如下:
jobmanager.rpc.address: node1
jobmanager.bind-host: 0.0.0.0
taskmanager.bind-host: 0.0.0.0
rest.bind-address: 0.0.0.0
这里演示环境的完整flink-conf.yaml文件内容如下:
################################################################################
#  Licensed to the Apache Software Foundation (ASF) under one
#  or more contributor license agreements.  See the NOTICE file
#  distributed with this work for additional information
#  regarding copyright ownership.  The ASF licenses this file
#  to you under the Apache License, Version 2.0 (the
#  "License"); you may not use this file except in compliance
#  with the License.  You may obtain a copy of the License at
#
#      http://www.apache.org/licenses/LICENSE-2.0
#
#  Unless required by applicable law or agreed to in writing, software
#  distributed under the License is distributed on an "AS IS" BASIS,
#  WITHOUT WARRANTIES OR CONDITIONS OF ANY KIND, either express or implied.
#  See the License for the specific language governing permissions and
# limitations under the License.
################################################################################


#==============================================================================
# Common
#==============================================================================

# The external address of the host on which the JobManager runs and can be
# reached by the TaskManagers and any clients which want to connect. This setting
# is only used in Standalone mode and may be overwritten on the JobManager side
# by specifying the --host <hostname> parameter of the bin/jobmanager.sh executable.
# In high availability mode, if you use the bin/start-cluster.sh script and setup
# the conf/masters file, this will be taken care of automatically. Yarn
# automatically configure the host name based on the hostname of the node where the
# JobManager runs.

jobmanager.rpc.address: node1

# The RPC port where the JobManager is reachable.

jobmanager.rpc.port: 6123

# The host interface the JobManager will bind to. By default, this is localhost, and will prevent
# the JobManager from communicating outside the machine/container it is running on.
# On YARN this setting will be ignored if it is set to 'localhost', defaulting to 0.0.0.0.
# On Kubernetes this setting will be ignored, defaulting to 0.0.0.0.
#
# To enable this, set the bind-host address to one that has access to an outside facing network
# interface, such as 0.0.0.0.

jobmanager.bind-host: 0.0.0.0


# The total process memory size for the JobManager.
#
# Note this accounts for all memory usage within the JobManager process, including JVM metaspace and other overhead.

jobmanager.memory.process.size: 1600m

# The host interface the TaskManager will bind to. By default, this is localhost, and will prevent
# the TaskManager from communicating outside the machine/container it is running on.
# On YARN this setting will be ignored if it is set to 'localhost', defaulting to 0.0.0.0.
# On Kubernetes this setting will be ignored, defaulting to 0.0.0.0.
#
# To enable this, set the bind-host address to one that has access to an outside facing network
# interface, such as 0.0.0.0.

taskmanager.bind-host: 0.0.0.0

# The address of the host on which the TaskManager runs and can be reached by the JobManager and
# other TaskManagers. If not specified, the TaskManager will try different strategies to identify
# the address.
#
# Note this address needs to be reachable by the JobManager and forward traffic to one of
# the interfaces the TaskManager is bound to (see 'taskmanager.bind-host').
#
# Note also that unless all TaskManagers are running on the same machine, this address needs to be
# configured separately for each TaskManager.

taskmanager.host: localhost

# The total process memory size for the TaskManager.
#
# Note this accounts for all memory usage within the TaskManager process, including JVM metaspace and other overhead.

taskmanager.memory.process.size: 1728m

# To exclude JVM metaspace and overhead, please, use total Flink memory size instead of 'taskmanager.memory.process.size'.
# It is not recommended to set both 'taskmanager.memory.process.size' and Flink memory.
#
# taskmanager.memory.flink.size: 1280m

# The number of task slots that each TaskManager offers. Each slot runs one parallel pipeline.

taskmanager.numberOfTaskSlots: 1

# The parallelism used for programs that did not specify and other parallelism.

parallelism.default: 1

# The default file system scheme and authority.
#
# By default file paths without scheme are interpreted relative to the local
# root file system 'file:///'. Use this to override the default and interpret
# relative paths relative to a different file system,
# for example 'hdfs://mynamenode:12345'
#
# fs.default-scheme

#==============================================================================
# High Availability
#==============================================================================

# The high-availability mode. Possible options are 'NONE' or 'zookeeper'.
#
# high-availability: zookeeper

# The path where metadata for master recovery is persisted. While ZooKeeper stores
# the small ground truth for checkpoint and leader election, this location stores
# the larger objects, like persisted dataflow graphs.
#
# Must be a durable file system that is accessible from all nodes
# (like HDFS, S3, Ceph, nfs, ...)
#
# high-availability.storageDir: hdfs:///flink/ha/

# The list of ZooKeeper quorum peers that coordinate the high-availability
# setup. This must be a list of the form:
# "host1:clientPort,host2:clientPort,..." (default clientPort: 2181)
#
# high-availability.zookeeper.quorum: localhost:2181


# ACL options are based on https://zookeeper.apache.org/doc/r3.1.2/zookeeperProgrammers.html#sc_BuiltinACLSchemes
# It can be either "creator" (ZOO_CREATE_ALL_ACL) or "open" (ZOO_OPEN_ACL_UNSAFE)
# The default value is "open" and it can be changed to "creator" if ZK security is enabled
#
# high-availability.zookeeper.client.acl: open

#==============================================================================
# Fault tolerance and checkpointing
#==============================================================================

# The backend that will be used to store operator state checkpoints if
# checkpointing is enabled. Checkpointing is enabled when execution.checkpointing.interval > 0.
#
# Execution checkpointing related parameters. Please refer to CheckpointConfig and ExecutionCheckpointingOptions for more details.
#
# execution.checkpointing.interval: 3min
# execution.checkpointing.externalized-checkpoint-retention: [DELETE_ON_CANCELLATION, RETAIN_ON_CANCELLATION]
# execution.checkpointing.max-concurrent-checkpoints: 1
# execution.checkpointing.min-pause: 0
# execution.checkpointing.mode: [EXACTLY_ONCE, AT_LEAST_ONCE]
# execution.checkpointing.timeout: 10min
# execution.checkpointing.tolerable-failed-checkpoints: 0
# execution.checkpointing.unaligned: false
#
# Supported backends are 'hashmap', 'rocksdb', or the
# <class-name-of-factory>.
#
# state.backend: hashmap

# Directory for checkpoints filesystem, when using any of the default bundled
# state backends.
#
# state.checkpoints.dir: hdfs://namenode-host:port/flink-checkpoints

# Default target directory for savepoints, optional.
#
# state.savepoints.dir: hdfs://namenode-host:port/flink-savepoints

# Flag to enable/disable incremental checkpoints for backends that
# support incremental checkpoints (like the RocksDB state backend).
#
# state.backend.incremental: false

# The failover strategy, i.e., how the job computation recovers from task failures.
# Only restart tasks that may have been affected by the task failure, which typically includes
# downstream tasks and potentially upstream tasks if their produced data is no longer available for consumption.

jobmanager.execution.failover-strategy: region

#==============================================================================
# Rest & web frontend
#==============================================================================

# The port to which the REST client connects to. If rest.bind-port has
# not been specified, then the server will bind to this port as well.
#
#rest.port: 8081

# The address to which the REST client will connect to
#
rest.address: localhost

# Port range for the REST and web server to bind to.
#
#rest.bind-port: 8080-8090

# The address that the REST & web server binds to
# By default, this is localhost, which prevents the REST & web server from
# being able to communicate outside of the machine/container it is running on.
#
# To enable this, set the bind address to one that has access to outside-facing
# network interface, such as 0.0.0.0.
#
rest.bind-address: 0.0.0.0

# Flag to specify whether job submission is enabled from the web-based
# runtime monitor. Uncomment to disable.

#web.submit.enable: false

# Flag to specify whether job cancellation is enabled from the web-based
# runtime monitor. Uncomment to disable.

#web.cancel.enable: false

#==============================================================================
# Advanced
#==============================================================================

# Override the directories for temporary files. If not specified, the
# system-specific Java temporary directory (java.io.tmpdir property) is taken.
#
# For framework setups on Yarn, Flink will automatically pick up the
# containers' temp directories without any need for configuration.
#
# Add a delimited list for multiple directories, using the system directory
# delimiter (colon ':' on unix) or a comma, e.g.:
#     /data1/tmp:/data2/tmp:/data3/tmp
#
# Note: Each directory entry is read from and written to by a different I/O
# thread. You can include the same directory multiple times in order to create
# multiple I/O threads against that directory. This is for example relevant for
# high-throughput RAIDs.
#
# io.tmp.dirs: /tmp

# The classloading resolve order. Possible values are 'child-first' (Flink's default)
# and 'parent-first' (Java's default).
#
# Child first classloading allows users to use different dependency/library
# versions in their application than those in the classpath. Switching back
# to 'parent-first' may help with debugging dependency issues.
#
# classloader.resolve-order: child-first

# The amount of memory going to the network stack. These numbers usually need
# no tuning. Adjusting them may be necessary in case of an "Insufficient number
# of network buffers" error. The default min is 64MB, the default max is 1GB.
#
# taskmanager.memory.network.fraction: 0.1
# taskmanager.memory.network.min: 64mb
# taskmanager.memory.network.max: 1gb

#==============================================================================
# Flink Cluster Security Configuration
#==============================================================================

# Kerberos authentication for various components - Hadoop, ZooKeeper, and connectors -
# may be enabled in four steps:
# 1. configure the local krb5.conf file
# 2. provide Kerberos credentials (either a keytab or a ticket cache w/ kinit)
# 3. make the credentials available to various JAAS login contexts
# 4. configure the connector to use JAAS/SASL

# The below configure how Kerberos credentials are provided. A keytab will be used instead of
# a ticket cache if the keytab path and principal are set.

# security.kerberos.login.use-ticket-cache: true
# security.kerberos.login.keytab: /path/to/kerberos/keytab
# security.kerberos.login.principal: flink-user

# The configuration below defines which JAAS login contexts

# security.kerberos.login.contexts: Client,KafkaClient

#==============================================================================
# ZK Security Configuration
#==============================================================================

# Below configurations are applicable if ZK ensemble is configured for security

# Override below configuration to provide custom ZK service name if configured
# zookeeper.sasl.service-name: zookeeper

# The configuration below must match one of the values set in "security.kerberos.login.contexts"
# zookeeper.sasl.login-context-name: Client

#==============================================================================
# HistoryServer
#==============================================================================

# The HistoryServer is started and stopped via bin/historyserver.sh (start|stop)

# Directory to upload completed jobs to. Add this directory to the list of
# monitored directories of the HistoryServer as well (see below).
#jobmanager.archive.fs.dir: hdfs:///completed-jobs/

# The address under which the web-based HistoryServer listens.
#historyserver.web.address: 0.0.0.0

# The port under which the web-based HistoryServer listens.
#historyserver.web.port: 8082

# Comma separated list of directories to monitor for completed jobs.
#historyserver.archive.fs.dir: hdfs:///completed-jobs/

# Interval in milliseconds for refreshing the monitored directories.
#historyserver.archive.fs.refresh-interval: 10000
2)masters修改项如下:
node1:8081
3)workers修改项如下:
node2
node3
四、配置服务器之间的免密登录
这里如果我们要启动flink的话,就得实现免密登录,在本站中关于免密登录已经介绍过了,可以参考:《免密登录配置》。
切记免密登录这里需要在3台服务器做配置,做到任意两台之间都直接免密码ssh登录。
五、进入到flink的bin目录,把flink启动起来
 cd /home/pubserver/flink-1.16.0/bin/
 ./start-cluster.sh
此时启动之后,我们可以在node1上执行jps命令,可以看到StandaloneSessionClusterEntrypoint这个进程

此时启动之后,我们可以在node2和node3上执行jps命令,可以看到TaskManagerRunner这个进程

六、进入flink的webUI界面看看
这里的访问地址是:http://${master_ip}:8081,进入后访问界面是这样的:
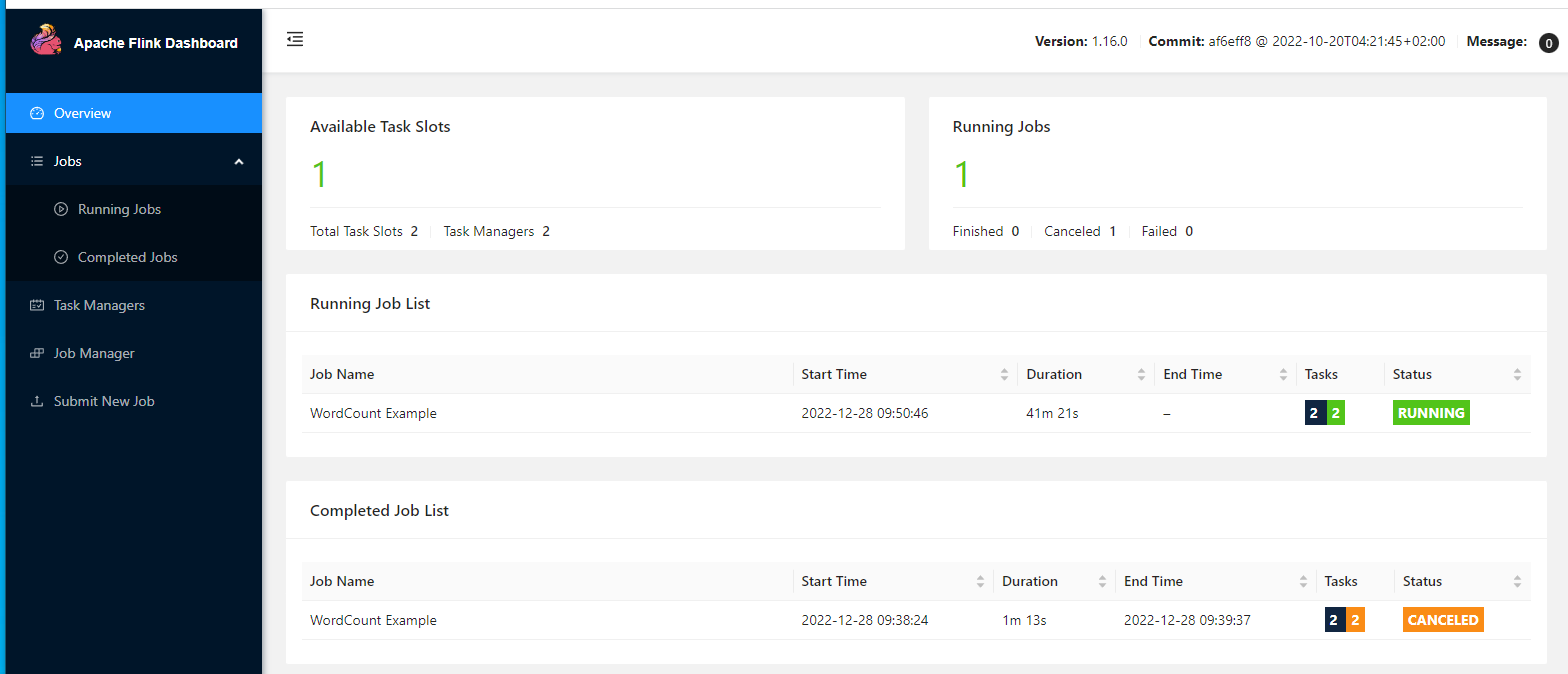
在这个界面里面,我们可以看到几个大的模块:
1)overview模块
这个模块主要是对整个flink集群做一个概览统计,主要显示对应的worker槽等信息,还有正在运行的job及已经执行完的job。
2)running jobs模块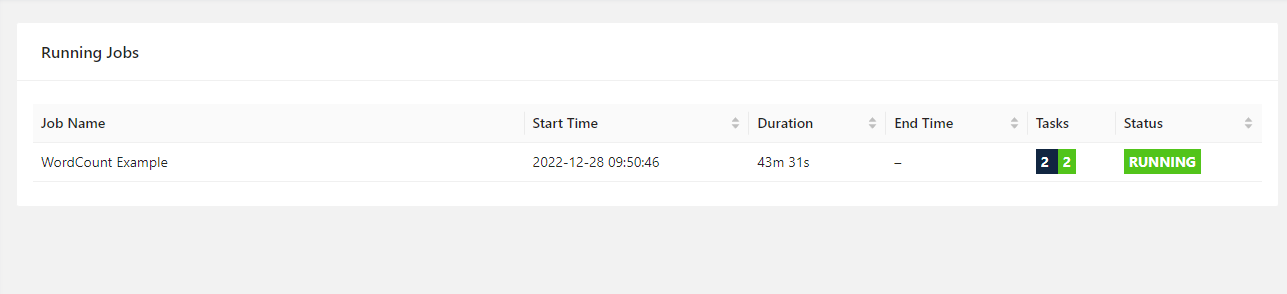
这里会展示所有的正在running的jobs列表
3)completed jobs
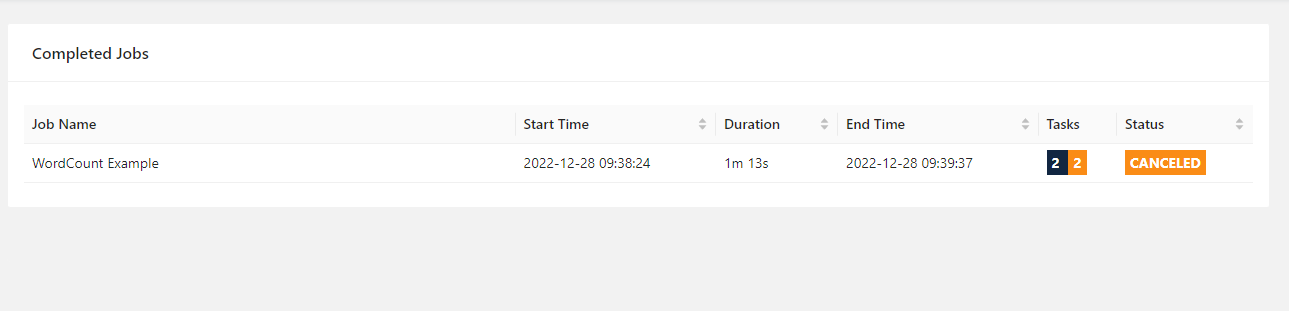
这里会展示所有的completed jobs,包含已经被取消的。由于flink的流处理job他是属于一个常驻的进程,如果我们想要关掉某个job可以在running jobs里面点击对应的job,在右上角会有一个cancel job的按钮,点击后job就被取消掉了。
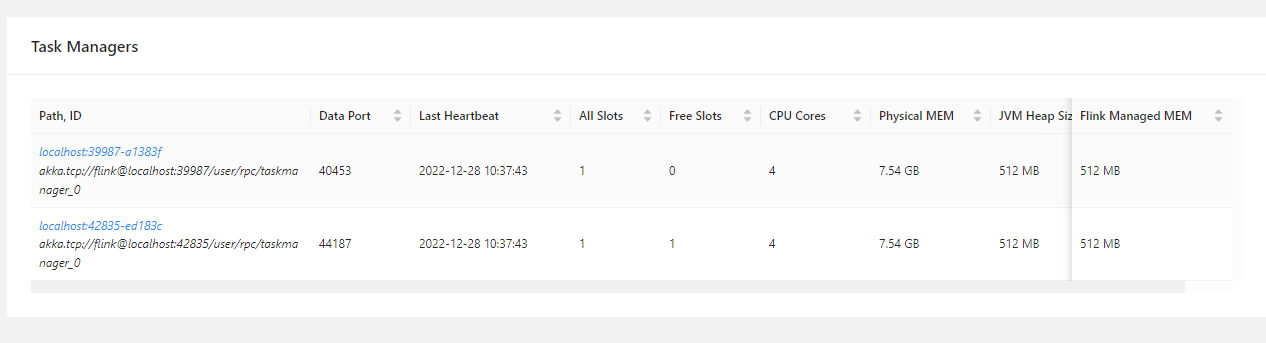
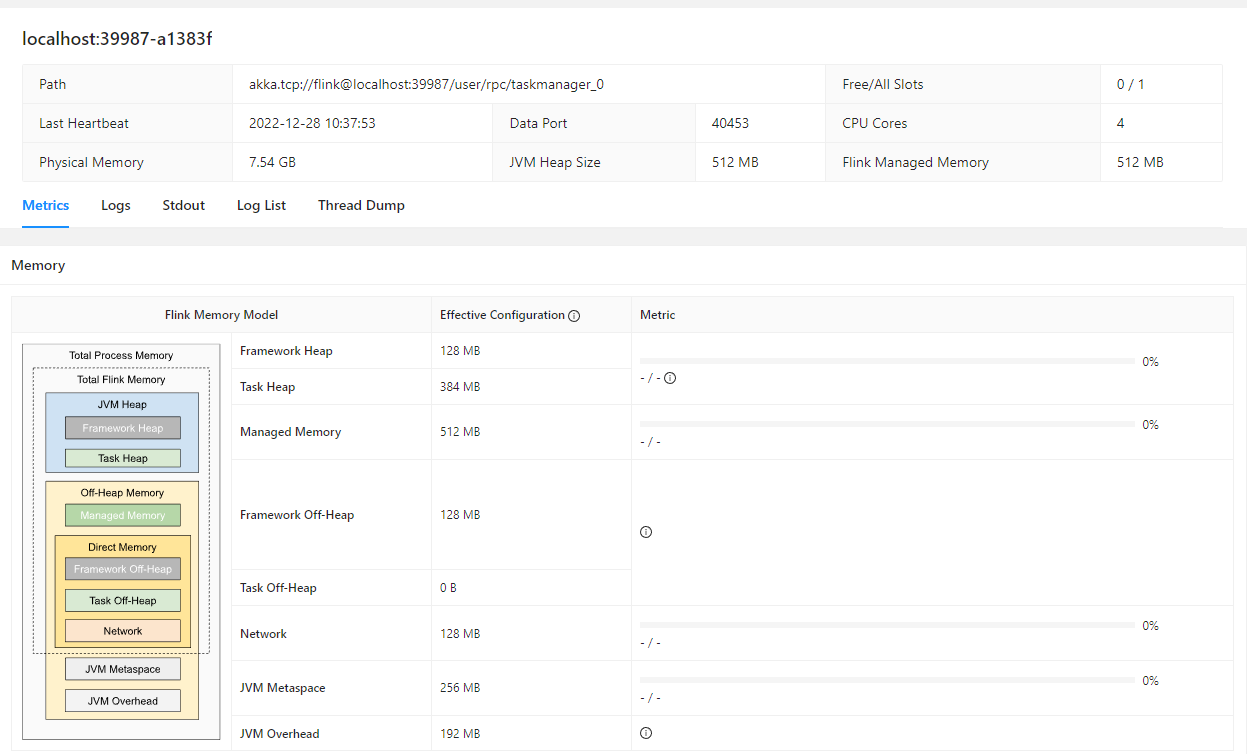
4)taskmanagers
这个模块主要是flink集群的workers节点的信息,及可以看到对应workers节点的日志,内存,job图等信息
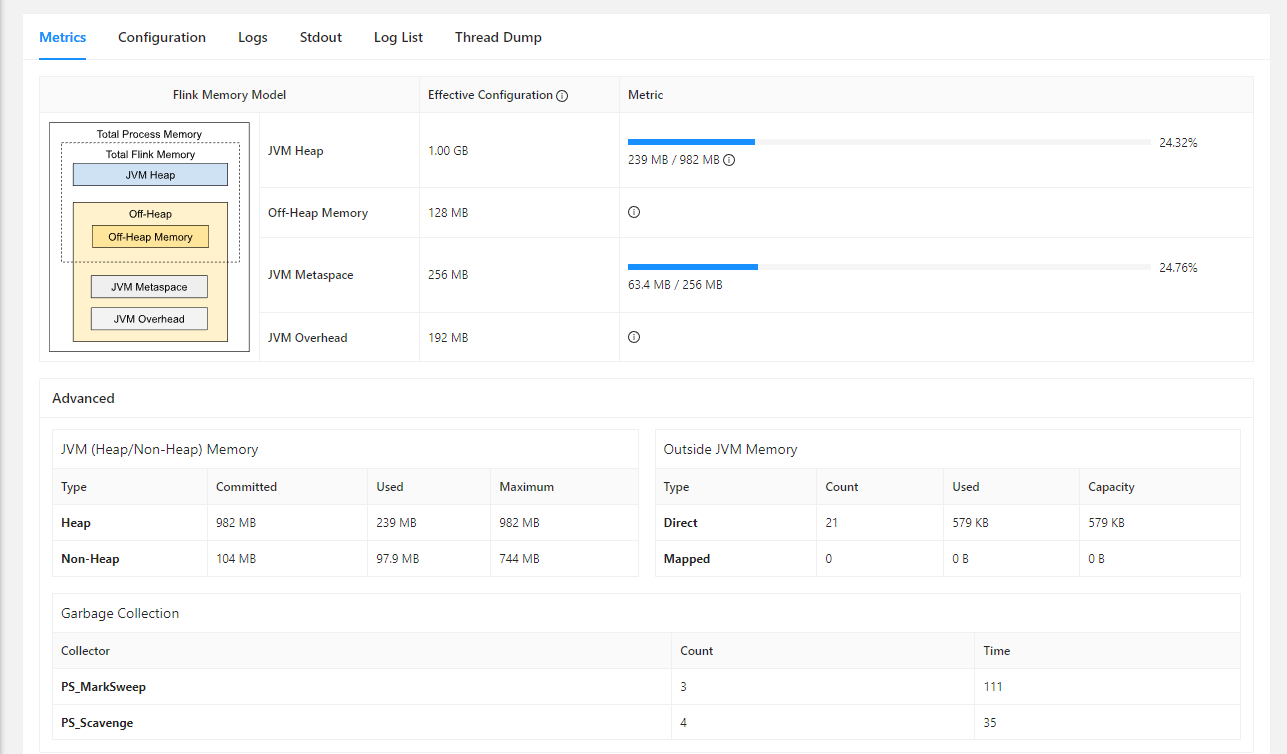
5)jobmanager
这里主要是查看相关的一些job管理的信息,例如jvm,日志,配置等
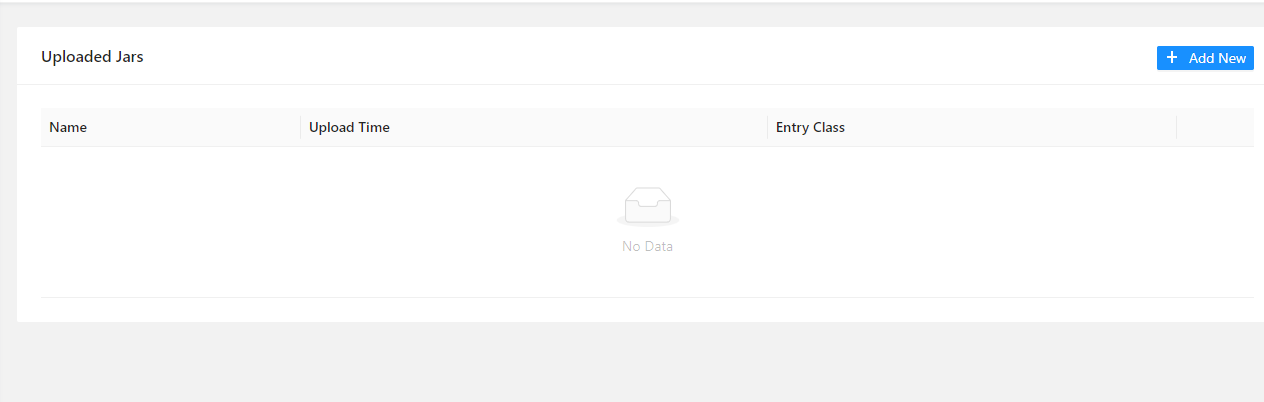
6)submit new job
这个模块相当于我们可以在ui界面直接上传相关的jar,实现不用登录服务器就把整个job给提交到flink集群中。
上传对应的jar包后,点击jar包,然后填写相关的参数即可
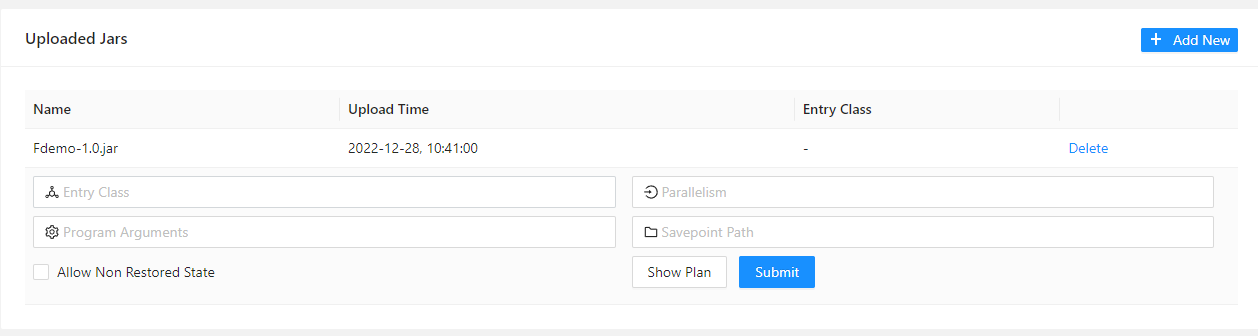
配置示例如下:
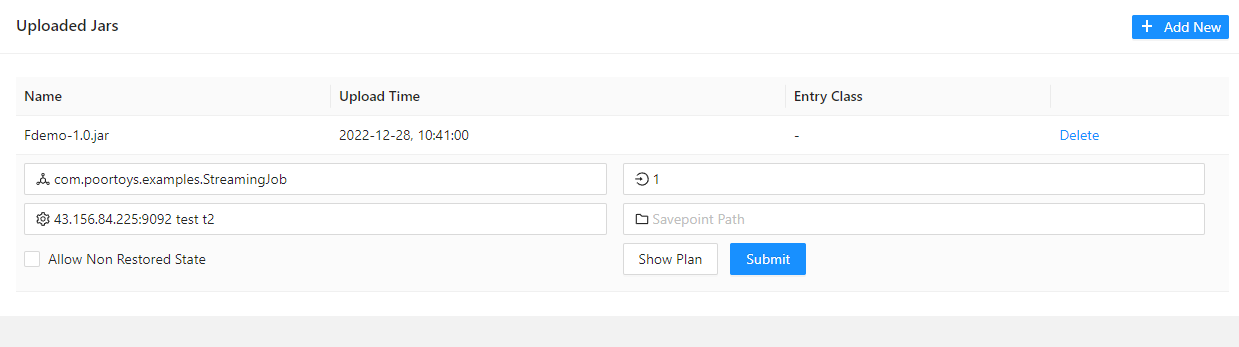 配置后点击submit即可,任务就被提交上去了。
备注:
1、这里的standalone的安装主要是在演示环境,所以没有配置ha,内存等,在生产环境需要有配置这些配置项的要求。
2、在flink-conf.yaml里面存在很多的localhost配置,我们需要把他修改为0.0.0.0,不然的话启动后flink的很多端口都是在监听127.0.0.1这个地址,造成的问题就是集群间无法访问。
3、在flink中,这个webUI是经常会使用的,所以要习惯从webUI上查看相关的信息。


还没有评论,来说两句吧...