
在DolphinScheduler中,我们还会涉及到经常使用到的一种任务类型,就是运行spark的任务,这篇文章我们介绍下使用DolphinScheduler配置下spark的对应任务。下面直接开始。
一、首先需要部署一个spark环境
这里首先我们需要一个spark的环境,所以这里spark的话,安装的话,可以参考这篇文章《spark安装配置篇(一)spark-3.4.0单机版安装教程》。
二、配置环境变量
这里我们需要在DolphinScheduler的配置文件中添加上spark的环境变量,然后把配置分发给每个节点,这里的配置文件内容如下:
#
# Licensed to the Apache Software Foundation (ASF) under one or more
# contributor license agreements.  See the NOTICE file distributed with
# this work for additional information regarding copyright ownership.
# The ASF licenses this file to You under the Apache License, Version 2.0
# (the "License"); you may not use this file except in compliance with
# the License.  You may obtain a copy of the License at
#
#     http://www.apache.org/licenses/LICENSE-2.0
#
# Unless required by applicable law or agreed to in writing, software
# distributed under the License is distributed on an "AS IS" BASIS,
# WITHOUT WARRANTIES OR CONDITIONS OF ANY KIND, either express or implied.
# See the License for the specific language governing permissions and
# limitations under the License.
#

# JAVA_HOME, will use it to start DolphinScheduler server
export JAVA_HOME=${JAVA_HOME:-/usr/local/jdk1.8.0_271}

# Database related configuration, set database type, username and password
export DATABASE=${DATABASE:-mysql}
export SPRING_PROFILES_ACTIVE=${DATABASE}
export SPRING_DATASOURCE_URL="jdbc:mysql://192.168.31.30:3306/scheduler?useUnicode=true&characterEncoding=UTF-8&useSSL=false"
export SPRING_DATASOURCE_USERNAME="scheduler"
export SPRING_DATASOURCE_PASSWORD="YmBDpz775TeWT6r2"

# DolphinScheduler server related configuration
export SPRING_CACHE_TYPE=${SPRING_CACHE_TYPE:-none}
export SPRING_JACKSON_TIME_ZONE=${SPRING_JACKSON_TIME_ZONE:-UTC}
export MASTER_FETCH_COMMAND_NUM=${MASTER_FETCH_COMMAND_NUM:-10}

# Registry center configuration, determines the type and link of the registry center
export REGISTRY_TYPE=${REGISTRY_TYPE:-zookeeper}
export REGISTRY_ZOOKEEPER_CONNECT_STRING=${REGISTRY_ZOOKEEPER_CONNECT_STRING:-localhost:2181}

# Tasks related configurations, need to change the configuration if you use the related tasks.
export HADOOP_HOME=${HADOOP_HOME:-/home/pubserver/hadoop-3.3.5}
export HADOOP_CONF_DIR=${HADOOP_CONF_DIR:-/home/pubserver/hadoop-3.3.5/etc/hadoop}
export SPARK_HOME1=${SPARK_HOME1:-/home/pubserver/spark-3.4.0-bin-hadoop3}
export SPARK_HOME2=${SPARK_HOME2:-/home/pubserver/spark-3.4.0-bin-hadoop3}
export PYTHON_HOME=${PYTHON_HOME:-/usr/bin/python}
export HIVE_HOME=${HIVE_HOME:-/home/pubserver/hive3.1.3}
export FLINK_HOME=${FLINK_HOME:-/home/pubserver/flink-1.17.0}
export DATAX_HOME=${DATAX_HOME:-/home/pubserver/datax}
export SEATUNNEL_HOME=${SEATUNNEL_HOME:-/opt/soft/seatunnel}
export CHUNJUN_HOME=${CHUNJUN_HOME:-/opt/soft/chunjun}

export PATH=$HADOOP_HOME/bin:$SPARK_HOME1/bin:$SPARK_HOME2/bin:$PYTHON_HOME/bin:$JAVA_HOME/bin:$HIVE_HOME/bin:$FLINK_HOME/bin:$DATAX_HOME/bin:$SEATUNNEL_HOME/bin:$CHUNJUN_HOME/bin:$PATH
三、在dolphinscheduler上面配置环境变量
这里在执行的时候,我们还是需要添加一下环境变量,因此在DolphinScheduler dashboard上添加一个环境变量,这里我们还是沿用之前配置的hadoop环境变量:
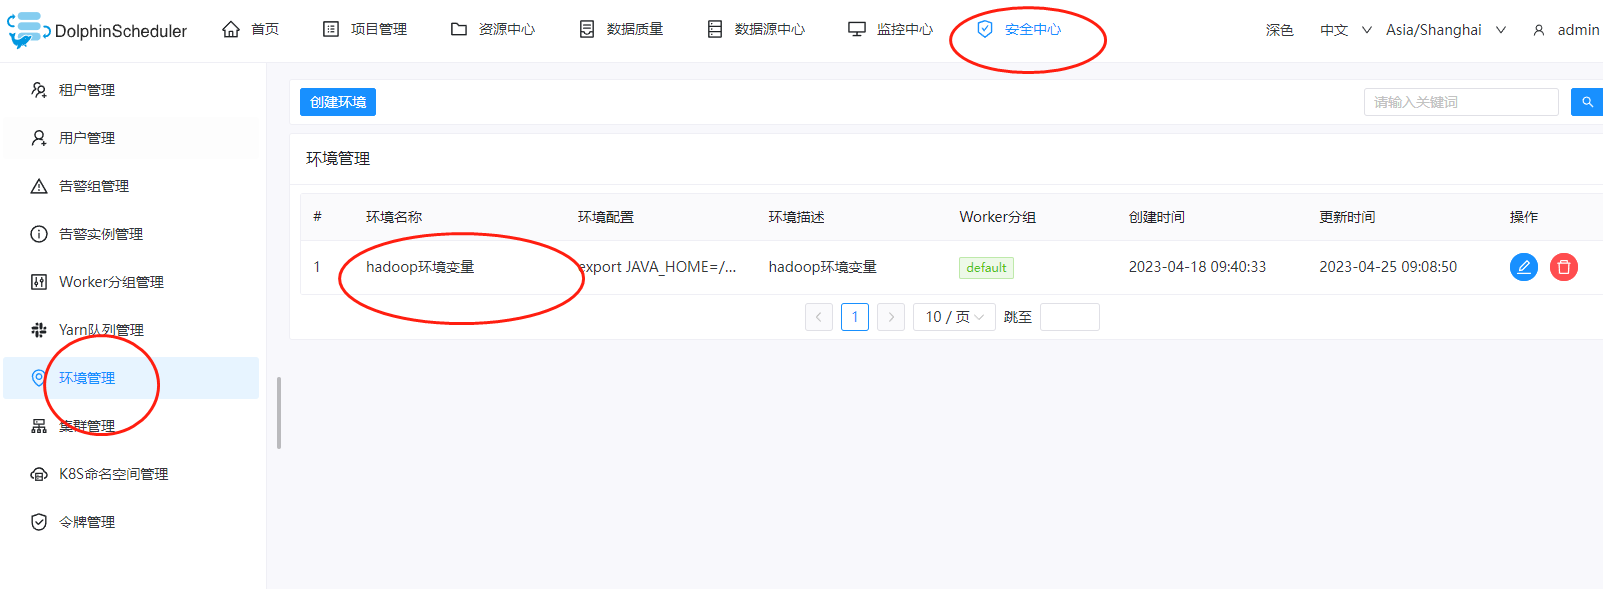
详细的配置如下:
export JAVA_HOME=/usr/local/jdk1.8.0_271
export HADOOP_HOME=/home/pubserver/hadoop-3.3.5
export HBASE_HOME=/home/pubserver/hbase-2.5.3
export HIVE_HOME=/home/pubserver/hive3.1.3
export FLINK_HOME=/home/pubserver/flink-1.17.0
export SPARK_HOME=/home/pubserver/spark-3.4.0-bin-hadoop3
export PATH=$PATH:$JAVA_HOME/bin:$HADOOP_HOME/bin:${HBASE_HOME}/bin:${HIVE_HOME}/bin:${FLINK_HOME}/bin:${SPARK_HOME}/bin
export HADOOP_CLASSPATH=/home/pubserver/hadoop-3.3.5/etc/hadoop:/home/pubserver/hadoop-3.3.5/share/hadoop/common/lib/*:/home/pubserver/hadoop-3.3.5/share/hadoop/common/*:/home/pubserver/hadoop-3.3.5/share/hadoop/hdfs:/home/pubserver/hadoop-3.3.5/share/hadoop/hdfs/lib/*:/home/pubserver/hadoop-3.3.5/share/hadoop/hdfs/*:/home/pubserver/hadoop-3.3.5/share/hadoop/mapreduce/*:/home/pubserver/hadoop-3.3.5/share/hadoop/yarn:/home/pubserver/hadoop-3.3.5/share/hadoop/yarn/lib/*:/home/pubserver/hadoop-3.3.5/share/hadoop/yarn/*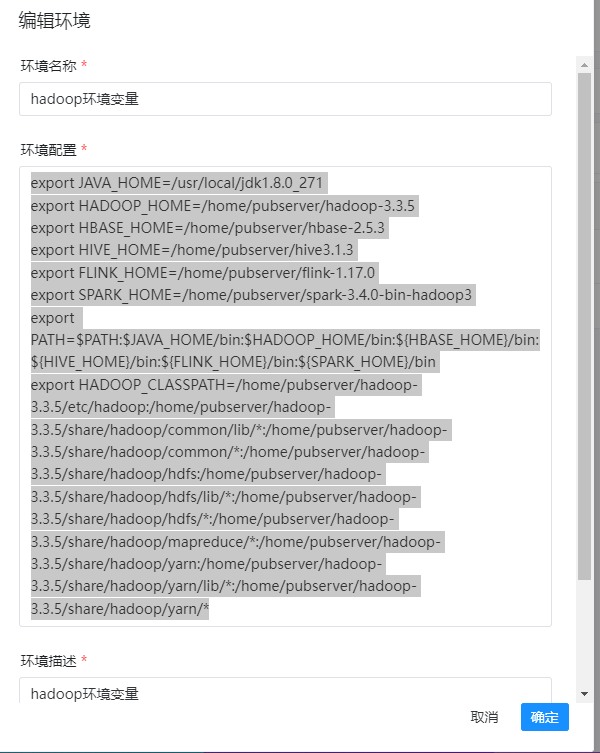
四、上传spark的example程序
这里我们还是使用spark的example的演示数据,这个example所在位置在:${spark-home}/examples/jars目录下有一个example程序:
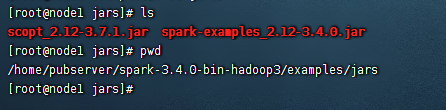
这里我们把jar包上传到DolphinScheduler的资源中心上

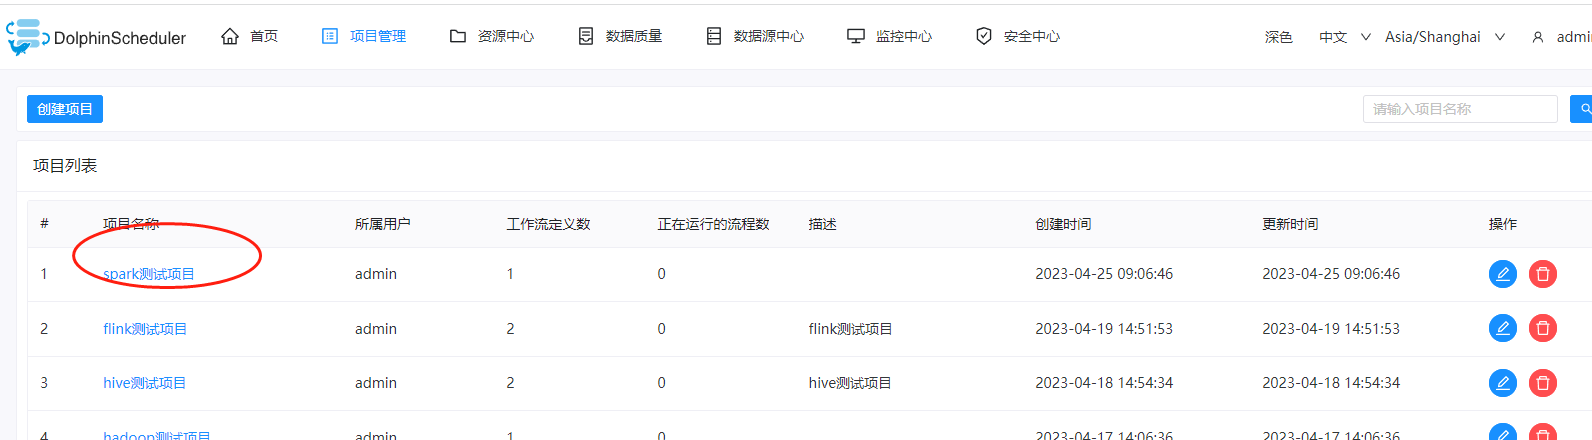
五、创建项目
这里我们创建一个spark的测试项目
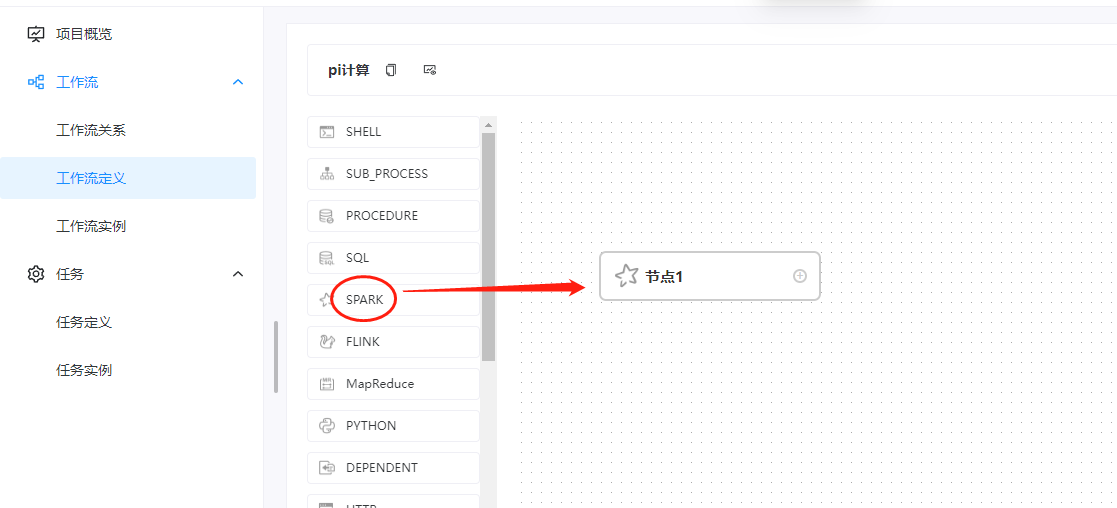
六、创建工作流
这里我们创建一下一个工作流,拖动的组建是spark组件:
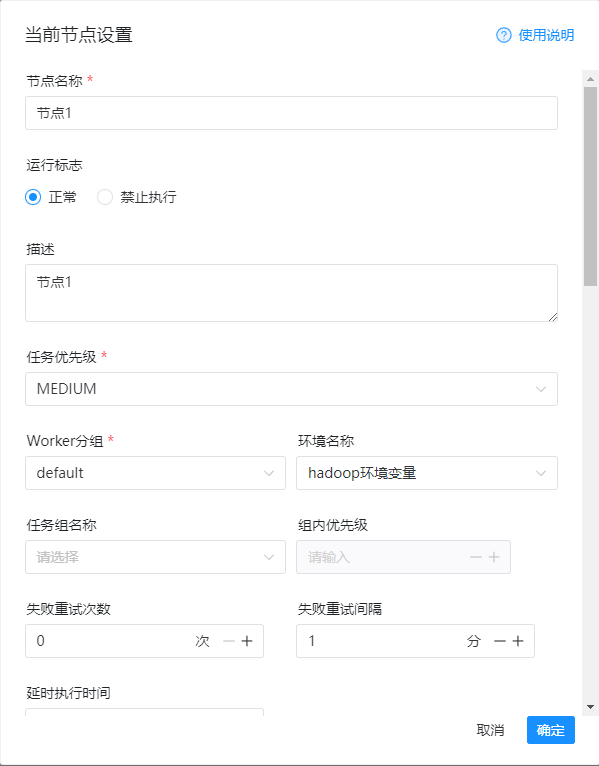
然后这里的编辑信息如下:
1)节点名称
节点1
2)环境名称
hadoop环境变量
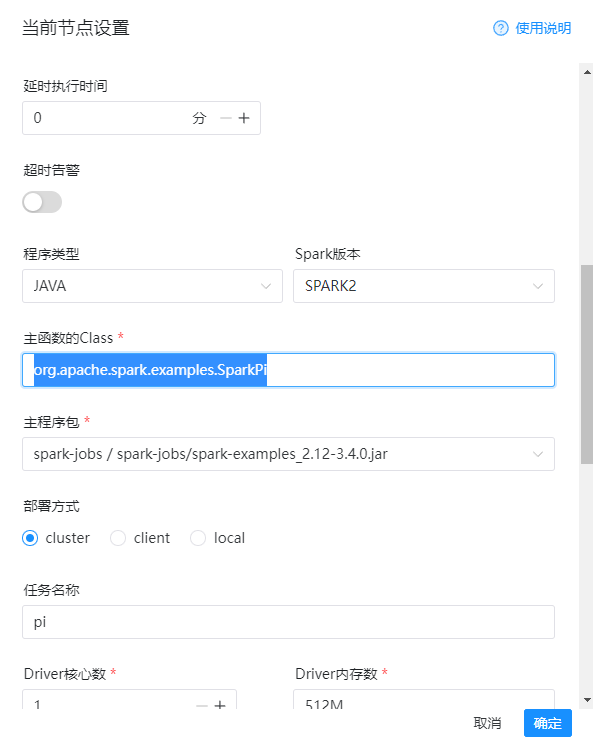
3)程序类型
java
4)spark版本
spark2
5)主函数class
org.apache.spark.examples.SparkPi
6)主程序包
spark-example-jar
7)部署方式
cluster
8)任务名称
pi
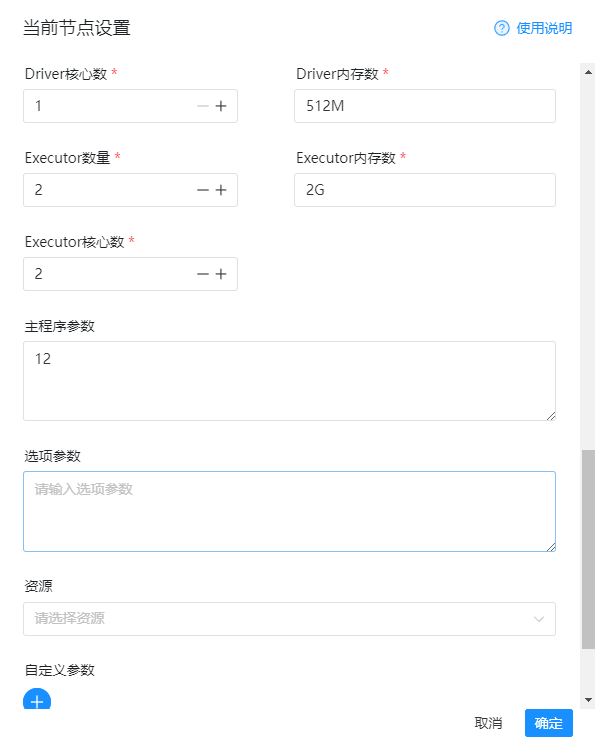
9)程序参数
12
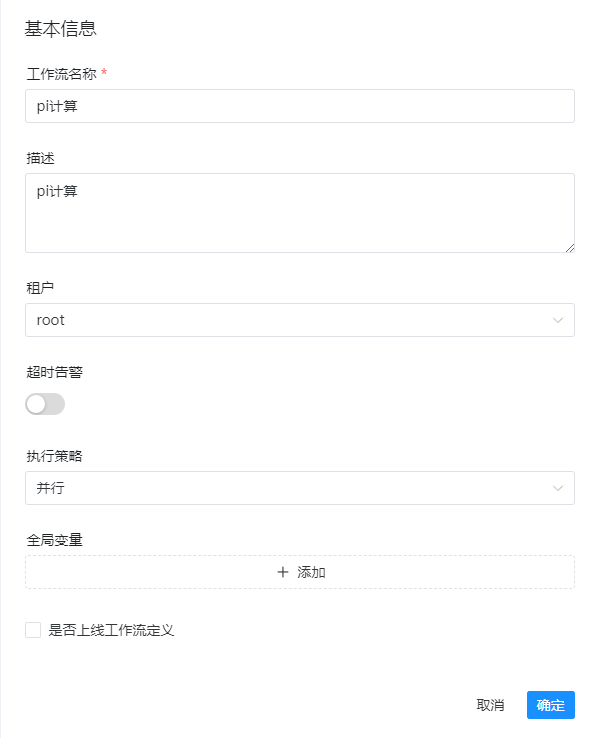
详细的配置如下图:
然后我们保存一下:
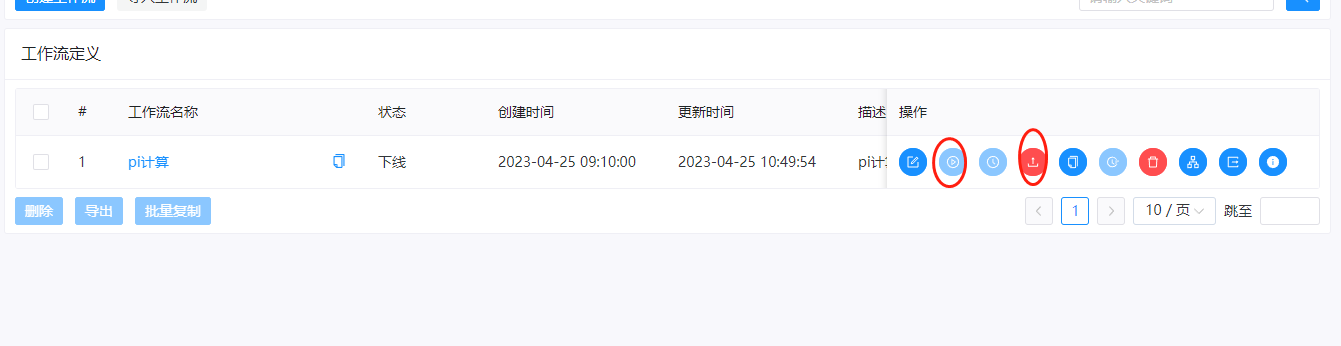
七、上线运行
这里我们把工作流进行上线和运行
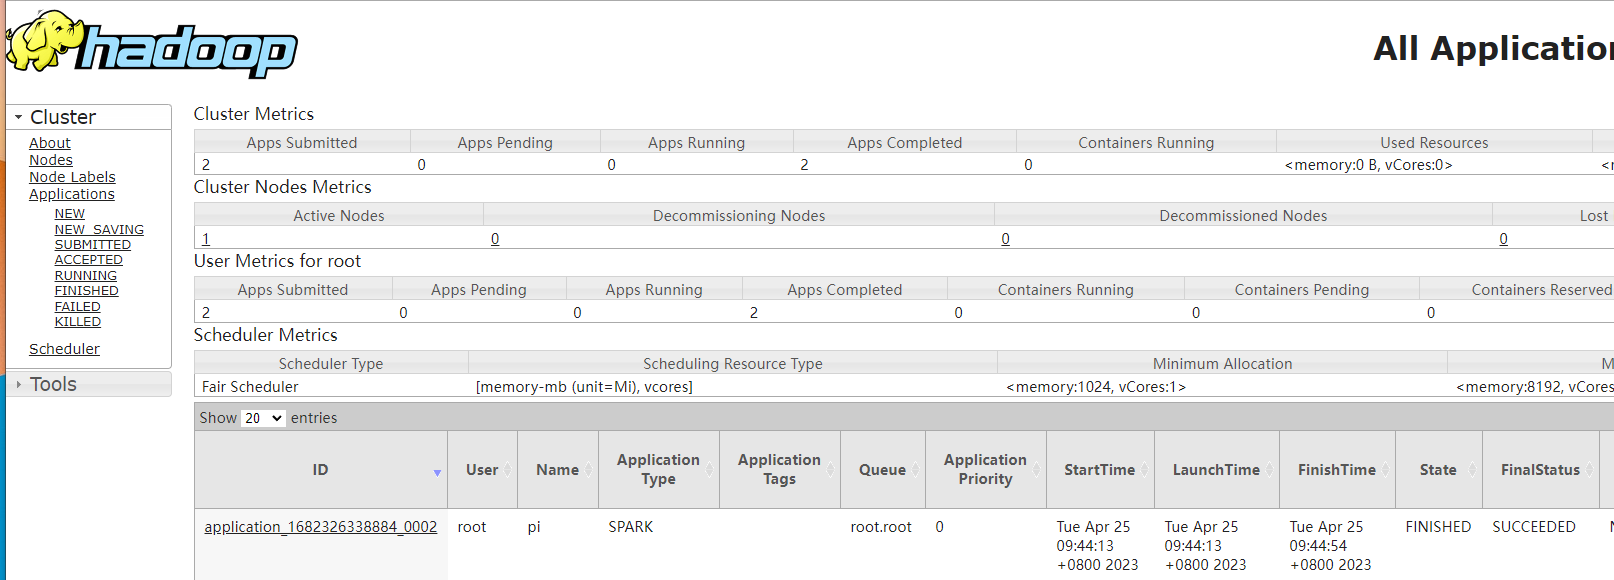
这里运行的时候,可以看到提交spark的job是提交到yarn上的,使用的命令是:
${SPARK_HOME2}/bin/spark-submit --master yarn --deploy-mode cluster --class org.apache.spark.examples.SparkPi --driver-cores 1 --driver-memory 512M --num-executors 2 --executor-cores 2 --executor-memory 2G --name pi --queue default spark-jobs/spark-examples_2.12-3.4.0.jar 12提交之后,我们就能从yarn上看到运行的任务了。
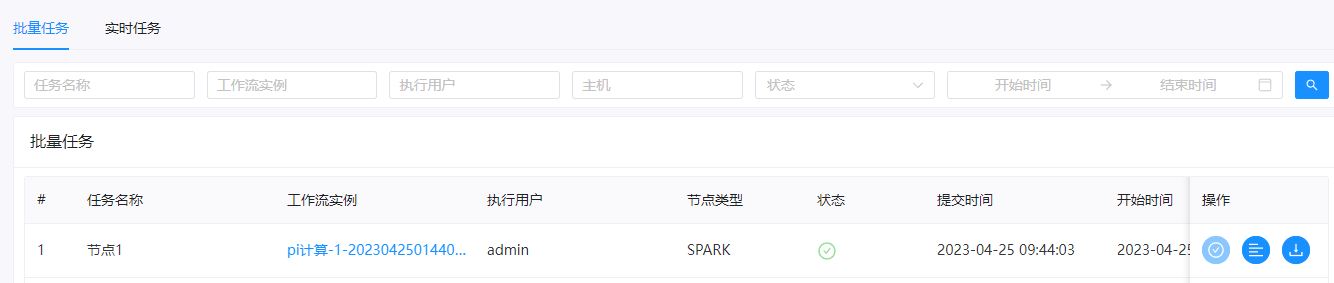
在DolphinScheduler中也能看到结果


还没有评论,来说两句吧...